


How To Select The Perfect Christmas Tree
Step 1: Choose the Right Tree
 Selecting the perfect tree is essential when it comes to decorating for Christmas. Get the best tree you can to ensure it lasts and looks great the entire holiday season. There are a lot of Christmas tree options out there from which to choose. Here are some examples of the most common trees out there at hardware stores and garden centers.
- Douglas Fir. These are the most common trees available. The trees are tall, slender and aromatic and their needles are short, soft and bluish-green. They need plenty of water to avoid shedding.
- Scotch Pine. Another common tree type. Scotch pines are the #1 sold Christmas tree in the U.S. They have very sturdy branches and also retain their needles better and last longer than some species. Needles are dark green.
- Blue Spruce. These trees have stiff needles that are a silvery green color. When watered adequately, these trees can last for a month and still look great.
- Fraser Fir. An attractive tree with green-and-silver, two-toned needles with good needle retention. Often referred to as the “no shed” tree.
If you are cutting your own Christmas tree, there are likely many tree farms in your area that will allow you to choose a tree and cut it down yourself. If you’ll be cutting your own, be sure you leave the house with a hand saw, some twine, a blanket for when you strap the tree to your vehicle and some gloves to protect your hands.
If you will be buying a pre-cut tree, make sure it is freshly cut. Touch the needles and branches to see if a significant amount comes off in your hand. Lightly bang the base of the tree on the ground; if an excessive amount of needles falls off, the tree is not fresh. Test the limbs to see if they are sturdy enough to hold the weight of ornaments. Also, if the tree is fresh, you should be able to smell the tree’s fragrance easily. The tree should be a dark green color all over with no areas of brown needles. Check to be sure that the bottom of the tree trunk is sticky with resin. Needles should not break when bent between your fingers. As when cutting down a tree yourself, bring twine and a blanket for strapping the tree to the top of your car, if you don’t have a truck or similar vehicle with room to stow the tree for the trip to your home.
-
Step 2: Find the Right Spot
Find the right location for your tree. A little forethought will help avoid any problems once you have your tree and start decorating for Christmas. Take the time to measure the dimensions of your room. Use a measuring tape to check the height, bearing in mind the dimensions of your tree stand. It’s a good idea to leave at least 6″ from the ceiling to the top of your tree. Don’t forget to ensure that the room is wide enough for the size of tree you want if you’re going to place the tree in a corner or alcove. Write these measurements down. Take your tape measure with you when you go to purchase the tree to be sure the Christmas tree you select will fit.
When you get your new tree home, be sure to put it into a bucket of water as you prepare to erect it. Don’t place the tree in high-traffic areas where it could get knocked over by children or pets, or where your family could trip over tree light electrical cords. Trees are usually best placed in a corner or in front of a window for optimal effect.
Safety Alert!
Never place your Christmas tree near a heat source, such as a radiator or fireplace, as this can present a fire hazard.
Helpful Tip
Consider anchoring the tree to a wall with a thin rope or heavy-duty string and an eyebolt as an added safety feature to help stabilize the tree. You can use this safety feature and easily hide it so it doesn’t detract from your tree’s appearance.
-
Step 3: Give It Water
Water your tree daily to keep your tree alive. Keep the tree stand filled with water at all times. The average tree can soak up to a gallon of water a day. When choosing a tree stand, be sure to find out how much water the stand holds when a tree is in it. Consider using Tree Preserve, a water additive that extends the life of the tree, keeps it greener longer, and helps prevent the needles from drying out. Remember, a thriving tree stays green longer and it makes it less of a safety hazard, as water keeps the tree moist and more fire-resistant.
Safety Alerts!
A dry tree can be a fire hazard. Before stringing lights on the tree, make sure the bulbs and the light string itself is in working order and intact without fraying or tears. Use lights rated for indoor use only. Do not place the tree directly in front of a heat or air conditioning duct as this will dry out the needles faster.
When the tree is plugged in, be careful when watering to avoid electric shock.
-
Step 4: Decorate It
Decorate the tree the way you want. This is the fun part! When adding lights to your Christmas tree, work from the inside, close to the tree trunk and out toward the tips of the branches. When you reach the tip of a branch, wrap your way back toward the trunk. Mini lights and C7 Christmas lights are typically used to decorate indoor trees.
Helpful Tip
Consider using LED holiday lights. They’re more efficient than regular light strings and don’t put off as much heat.
-
Step 5: Recycle It
Dispose of your tree properly after the holiday season—don’t just throw out your tree with the trash. Recycle or mulch it yourself. Many municipalities have recycling centers where you can take your tree or have it picked up for recycling. Check with your local officials to see what options are available.
Happy holidays! With good care, a Christmas tree can easily stay fresh for a month or even longer.
Shrubs for Summer Color
Shrubs for Summer Color
Many gardeners assume that the brightest flowers are only seen in spring, but there are many stunning shrubs that have great color all through the summer. Some feature outstanding blooms while others have equally showy foliage and can brighten up any yard. But which will look best in your yard?
Top Summer Color Shrubs
There are a number of tried-and-true summer-flowering shrubs that never fail to be impressive. Consider these favorites to enhance your landscape all summer long.
- Hydrangea
This very popular mounding shrub is an old-fashioned favorite, but it doesn’t have to be just your grandmother’s shrub – there are hydrangeas for every situation and taste. Flowers appear in early summer and can last for several weeks. Choose from pink, blue (use an acidic fertilizer to maintain this unusual color) or white blooms. Large flower heads great for drying or make outstanding arrangements and bouquets when cut. These shrubs do best in light shade or sun. One of the easiest hydrangeas to grow is the native American oak-leafed hydrangea has lobed leaves with fragrant, conical-shaped flower heads.
- Butterfly Bush (Buddleia)
This dramatic shrub is truly a butterfly magnet, and hummingbirds love it as well. One of the most fragrant flowering shrubs, butterfly bush blooms from early summer to autumn frost, and different varieties can thrive in a wide range of growing zones. The flowers can be pink, purple, blue, yellow or white, and often feature elegant spiked panicles, arching branches and interesting foliage. These shrubs do best in full sun and come in different sizes to suit different landscaping areas.
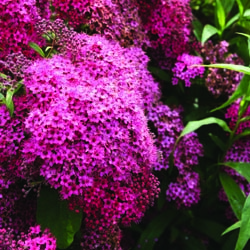
- Spirea
A generally low-maintenance choice, this shrub features golden yellow to lime-colored foliage all summer with pink or lavender blooms in late spring through summer. Goldmound, Gold Flame and Anthony Waterer are all great cultivars and easy care shrubs growing to about 2-4’ by 3-5’. This truly is the perfect shrub to use anywhere in the landscape, and it can tolerate sun to part shade growing conditions.
- Rose of Sharon (Hibiscus)
This is one of the showiest plants of the summer, and Rose of Sharon is also one of the easiest to grow. Dense growing and upright when young these shrubs will spread with age, so take care to plant them in appropriate spaces to avoid overcrowding. The dark green foliage contrasts nicely with large, showy flowers that can be up to 4” across. Flowers open in July and will continue blooming through late summer and into fall. Flowers are sterile, eliminating seed problems. This shrub is ideal to plant as a screen, hedge or focal point in full sun.
- Blue Mist Spirea (Caryopteris)
This shrub is a great plant for late summer color with bursts of purple-blue flowers just when many other plants are growing dull. Its low-growing, mounding habit reaches 2-3’ wide by 2-3’ tall. Blue Mist Spirea is easy to grow and can tolerate some neglect. It should be planted in full sun, and will bloom from summer to fall.
With any of these shrubs in your yard, your summer landscape can be just as colorful and eye-catching as any spring flowers or autumn foliage.
July Gardening Tips
July Gardening Tips
Regional Gardening Tips for Summer
:max_bytes(150000):strip_icc()/GettyImages-591213519-1--577175bc5f9b585875bb53b3.jpg)
July gardening chores run the gamut. If only July were more predictable in the garden. It doesn’t matter how wet the spring was, rain can become very elusive in July. Humidity begins to peak. It’s the beginning of the rainy season in Florida. And warmer zones are actually passing out of prime growing conditions into the lethargy of the dog days.
So there’s no definitive list of gardening chores for the July garden.
Gardeners just have to play it by ear. Most importantly, keep a close eye on pests and disease, then sit back and enjoy your garden and all the efforts you put in earlier in the year to get it where it is now.
July Gardening Chores for All Hardiness Zones
- Slow down and give you and your plants a rest from the heat. It can be very stressful growing and setting flower buds for several months, let alone doing it in heat.
- Give plants a mid-season feeding or side dressing of compost, to get them through to the fall.
- Keep tabs on rainfall and water as needed. Most plants need at lest an inch of water per week, more if the weather is very hot and dry. Remember to water deeply.
- Stay ahead of weeds. Pulling them before they flower could save you from thousands of new weeds.
- Replace mulch as needed. It naturally decomposes and may need replenishing.
- Check garden centers for mark downs on remaining plants. Be sure to check that they are healthy and not pot bound or full of weeds.
- Keep lawns at about 3 inches, to protect from summer heat.
- Keep bird feeders and baths clean.
Special Care for Ornamental Plants in July
- Keep up on deadheading. The more you deadhead, the more your flowers will re-bloom.
- Shear back spent annuals by one-third. The old foliage gets worn out by mid-summer and shearing it back will encourage fresh new growth to fill in.
- Focus on heat and rain resistant flowers like: coleus, hibiscus, melampodium, pentas, plumbago, portulaca and zinnias.
- Do a final pinching by mid-July, of fall blooming flowers like mums and asters.
- Divide Iris.
Vegetable Garden Maintenance in July
- Harvest daily. Some vegetables, like zucchini and cabbages, can mature in the blink of an eye. Don’t let them get tough or split open.
- Find a Plant a Row for the Hungry program to donate your surplus vegetables to.
- Succession plant bush beans and lettuce, to replace fading plants.
- Start fall crops of peas and cole crops. Keep them well watered, until temperatures cool down.
- Time to dig the garlic, onions and early season potatoes. Onion tops will fall over when they are ready to harvest. Garlic and potato plants will start to decline as they mature underground. Dig a few to test.
- If your potatoes are not quite ready to harvest, treat yourself to some new potatoes. Carefully loosen the soil under your plants to find a few small potatoes to harvest.
- Plant a cover crop in bare spots in the vegetable garden. It will feed the soil and keep weeds from moving in.
July Fruit Care
- Check your berry bushes regularly to harvest before the birds get them. Birds will start munching on berries such as raspberries and blackberries even before they are fully ripe.
- Clean up fallen fruits under trees. Rotting fruits are an invitation for diseases, insects, and foraging animals.
- Check fruit trees for water sprouts (branches growing straight up from limbs) and remove them while they are small. They will only draw energy from the fruiting branches of the trees.
July Tree and Shrub Care
- Prune summer flowering shrubs as soon as the blossoms fade. The plants will look better and they can store their energy rather than spend it developing seed.
- Hold off on planting until the fall. It is too hot and dry in July for most plants to handle the stress of transplanting. The exception is potted plants that are struggling in their containers. If you must transplant, keep them well watered.
Pests to Watch For in July
- Thrips (distorted flowers)
- Spider mites (undersides of leaves)
- Tomato fruitworm
- Tomato horn worm
- Chinch bugs in lawns
- Japanese beetles.
July Gardening in Warmer Areas (USDA Zones 8 and Above)
- It can be too hot to grow vegetables this month in many areas. If that’s the case, consider planting a quick cover crop, to feed the soil.
- Your prime gardening season is coming up, especially in the vegetable garden. It time to start planning your fall garden.
- Start seeds of heat loving vegetables like tomatoes, peppers, okra, eggplant, and cucumbers
- It is still a good time of year to plant container grown citrus trees and tropical fruits.
- Succession sow sunflowers (every 2 – 3 weeks) for a steady supply.
Special Garden Consideration for the Gulf Coast and Florida
- Prepare for hurricane season and keep dead limbs pruned
Nothing Says Welcome Home Like An Entry Garden
Nothing Says Welcome Like an Entry Garden
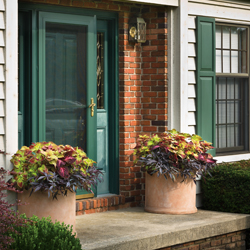
Now is the time to start planning your entry garden. This welcoming patch has the power to set a warm and friendly tone for those who pass through your garden on the way to your front door. It does take some planning to set the proper mood, however, and you need to consider architecture, setting, scale, boundaries and maintenance.
Architecture and Setting
First, it is critical that your garden style suits your architecture and setting to create a cohesive, uniform look. Try to match the hardscaping and plants to the style and feel of your house. A cottage or farmhouse would be accentuated by a friendly, loose informal garden with plants spilling onto the walkway and colors blending together at the edges of beds. A more formal and symmetrical building, however, should be paired with a more structured garden that includes well-groomed shrubbery, stately flowers and a well-defined path.
Plant Scale
Pay attention to the scale of the plants you choose. Plants that will grow too tall or broad can overwhelm the house or crowd the walkway. Plants that are too small can make the house feel too large and unwelcoming. Investigate the mature sizes of plants and be sure they are positioned appropriately within your entry garden so they will not crowd one another or block key features of your home, such as house numbers or security lighting.
Garden Boundaries
Consider setting boundaries for the garden using a fence, wall, hedge or gate. The boundary could encompass just the area around the front door, might include a flowerbed border or could frame the whole yard, but keep in mind the size and style of your home. A white picket fence around the entire yard is a quaint option for a cottage-esque home, but would look out of place with an elegant brick manor, which would be more suited to a wrought iron boundary or classic boxwood hedges.
Maintaining Your Entry Garden
Be realistic about the amount of time you have to maintain your entry garden. If you have limited time, choose native or easy to care for plants that will require little attention. Also consider using containers for some of the plants. They can be easily rearranged throughout the seasons to give a different look to the garden, and plants can be brought in over the winter months. Keep in mind essential tasks such as weeding, pruning and watering, and plan the garden to suit your abilities, time and budget so you can always keep it in perfect condition to welcome visitors.
With a little planning, you can create a welcoming entry garden to beautifully greet guests as they visit your home.
Dealing With Winter Damage
Dealing With Winter Damage

It’s early spring – time to survey the damage that winter has produced. In some areas, shrubs may still be hiding under piles of frozen snow, and could be crushed or compacted. Severed tree limbs may lie scattered across the landscape, and bark may be torn and stripped from trunks. It’s difficult to know what to tackle first, but fortunately, much of the damage is easily correctible.
Repairing Winter-Damaged Trees
When surveying and repairing winter damage, start with your trees – they are generally the most valuable additions to your property. As you survey the damage – broken limbs, torn bark, a tilting trunk – ask yourself “Is this tree salvageable or should it be removed?” If the damage is extensive, or you are unsure about how the damage may affect the tree’s overall health or future growth, hire a professional for a consultation. Replacing a severely damaged tree with a younger one, perhaps a type you like even better, may be the best solution.
If a limb is broken somewhere along its length, or damaged beyond repair, employ good pruning practices and saw off the remaining piece at the branch collar, being careful not to cut into the trunk or leave a stub. Sometimes a fallen limb may strip bark off the tree trunk. To repair this damage, cut the ragged edges of the loose bark away from the stripped area to firmly affixed healthy bark. Nature will take care of the rest. Even if the trunk of the tree is split, the tree may still be saved. For large trees, repairing this type of damage usually requires cabling and bracing done by a professional. If the tree is still young, the crotch may be pulled tightly together and tied or taped until the wound eventually heals.

Repairing Winter-Damaged Shrubs
Shrubs can suffer the same damage as trees, including broken limbs and stripped bark. Heavy snowfall can crush smaller shrubs, and larger varieties may have their trunks or centers split from heavy snow or ice accumulation. Most shrubs are resilient, however, and slowly regain their shape as the weather warms. If branches are bent but not broken, you may tie them together to help them along and prevent further damage from late-season storms. Do not tie tightly and remove twine after about a year. Completely broken branches may be pruned away, but take care to maintain the shrub’s form and balance, keeping in mind its growth pattern so it will not look lopsided or ungainly. Again, if the damage is severe, you may need to replace the plant.
The harder the winter is, the more of a beating trees and shrubs will take. With prompt attention in early spring, however, you can easily undo much of the damage and help your landscape recover with ease.
Spring Cleaning Tips for Your Yard and Garden
Spring Cleaning Tips for Your Yard and Garden
The snow and ice have melted, but this winter’s wild storms have left yards across the country in need of a major spring-cleaning. Here are some ideas for how to begin, inspired by the hyper-organized folks at Uncluttered:
- Remove the debris. If the winter’s seemingly incessant wind, rain, and snow have done a number on your trees, start your clean-up efforts by collecting the fallen branches and scattered sticks. If your town doesn’t pick up lawn debris on a regular basis, find out if any spring collection days have been planned or if there’s a nearby drop-off location you can deliver it to. You also can rent a wood-chipper from many garden or hardware stores and turn your debris into mulch.
- Rake dead leaves and twigs. Last year’s leaves will make great compost, but not if they keep the grass from absorbing sunlight. Thoroughly rake the yard and garden beds and, if you don’t plan to compost, investigate whether your town will be making special arrangements to collect bagged leaves.
- Prune and trim. Prune back weatherworn bushes and hedges as well as any perennials that look overgrown. Trim damaged tree limbs and branches that you can reach, and make arrangements for a professional tree-trimmer to take care of the rest.
- Map out landscaping and garden plans. If you’re going to make any changes to your current landscaping, make a sketch of your lawn indicating what sort of trees, shrubs, or plants you’d like to add. Even for DIY types, it’s always a good idea to consult with a gardener or landscaper at the nursery before making any final decisions or purchases.
- Start planting. Check the planting dates on your new purchases. Any plants, trees or shrubbery hearty enough to survive early spring’s still-cool nights can be put in the ground now.
Source: Unclutterer.com
Your Guide To Successful Planting This Spring
Planting Trees & Shrubs

Before You Plant
Always plant in a well drained soil. To test for soil drainage, dig a hole for your new plant and fill it with water. If the water doesn’t drain in 12 hours, the soil in that area will need to be amended dramatically.
What Plant Form are You Transplanting?
Your tree or shrub will come in two forms: Balled and burlapped (B&B); or containerized. Containerized or B&B plants can be planted any time the ground is not frozen. If possible plant your tree or shrub as soon as you get it home. Otherwise, it may dry out and become injured. If you can’t plant it immediately, place it in a shady and/or sheltered location. Keep the soil moist until planted.
The Planting Hole
To plant your tree or shrub dig a hole twice as wide as the diameter and 6”-8” deeper than the root ball, replacing the 6”-8” of soil with enriched backfill. Compact this 6”-8” of soil. Once the plant is placed in the hole, the top of the root ball should be slightly above or level with the surface of the ground. Placing Your Plant in the Hole Remove all tags, wires or ropes from the stems or trunk, and do the following: Balled & Burlapped Plants: DO NOT remove the wire basket. Once the enriched soil has been placed ¾ of the way up the
Placing Your Plant in the Hole

Remove all tags, wires or ropes from the stems or trunk, and do the following:
Balled & Burlapped Plants
DO NOT remove the wire basket. Once the enriched soil has been placed 3/4 of the way up the root ball, cut & fold down the top 1/4 of the basket & burlap, remove any strings around the tree trunk. Fill the remaining hole with enriched soil to its original level.
Container Plants
Ease the pot off without disturbing the root ball. If the roots are extremely compacted, you may need to make a few shallow cuts through the roots on the side and bottom of the root ball.
Enriching Your Soil & Backfilling
Mix the soil taken out of the hole with Bumper Crop then backfill around the root ball. Tamp the soil lightly every 2”-3”, and fill the hole with the enriched soil to its original level. Use excess soil to build a ring 6” –10” from the outside of the hole. This will help the water to move slowly down to the root zone of the plant as well as minimize the runoff.
Watering
Water your newly planted tree or shrub by using a slow, deep watering method. B&B and container plant roots dry out faster than the soil around them, so it is important to monitor their soil moisture. Water slowly to attain deep water penetration which encourages widespread root development. You will need to water once every 7-10 days (or more during hot dry periods). Apply Root Master B1 after every watering
 General Watering guidelines:
1 gal. Pot – trickle water for approx. 15-20 minutes
2 gal. Pot – trickle water for approx 30-40 minutes
3 gal. Pot – trickle water for approx 40-50 minutes
4 gal. To 7 gal. – trickle water for approx 60 minutes
B&B – trickle water for 60-70 minutes
Remember, if it rains for 1 hr, it probably was not enough water for a newly planted shrub or tree.
 Water your plants thoroughly, then remove them from their pots by inverting them and supporting the root ball. If the roots are compacted, you may need to make a few shallow cuts through the roots on the side and bottom of the root ball. Place your plant into the hole. Add the enriched soil to ground level. Water the plant thoroughly to ensure the soil fills in completely around the roots, eliminating air pockets. Apply Rootmaster B1 at this time. Reapply Rootmaster B1 at every watering for the first year. Monitor your plants daily. Water slowly to attain deep water penetration which encourages widespread root development. Feed perennials bi-weekly with Bud & Bloom fertilizer. Add a 2”- 3” mulch layer around the plant. This will prevent water loss and keep mowers & trimmers from getting too close to the plant. Avoid overly deep mulch against the stem or trunk of the plant, as this can promote disease or pest injury.
Staking
Unless necessary, trees should not be staked. If your tree or shrub is top heavy or in an exposed area, you may stake the plant to anchor the root ball so roots can develop rapidly into the new soil around the tree. Connect the stakes to the trunk with flexible lines and straps designed for this use. Allow for some movement in the plant for strong growth. Remove the stakes and lines after one growing season so you do not inhibit trunk development.
Mulching
 Add a 2”-3” layer of shredded mulch or chips around the plant. This will prevent water loss and keep mowers and trimmers from getting too close to the plant. Avoid overly deep mulch against the trunk or stem of the plant as this can promote disease or pest injury.
Planting Perennial & Annual Plants

Plant your plants around your planting area while still in their pots. Make sure you have taken into consideration the mature height of the plants as well as the sun or shade requirements. Determine an appropriate location for planting, then dig a hole2 times the width & 6”-8” deeper, replacing with enriched soil (compact this 6”-8” of soil) Add a generous amount of Bumper Crop to enrich the soil. Blend into the soil.
For Successful Planting
 Bumper Crop
An all-organic soil builder with high organic nutrient content and endo- and ecto-mycorrhizal fungi.
Master Start
A fertilizer for all new plantings of sod or seeded lawns, shrubs, ground covers, flowers, or bare root plantings. Provides the right nutrient mix to develop a sturdy root system and strong top growth.
Root Master B1
Formulated to reduce plant shock and improve resistance to stress. Improves water and nutrient uptake.
Front Porch Ideas For Thanksgiving
The great thing with Halloween and Thanksgiving in succession is that you can put up fall decorations for both occasions. In fact, with added garden lights and Hollies, it can go all the way until Christmas. Pumpkins and autumn plant colors also give a rustic charm to a Thanksgiving garden–which how this Holiday should always be through the years.

Nothing says welcome to your guests better than a well-decorated front porch or door. Having some potted Chrysanthemums in handy for a quick and easy design will help.
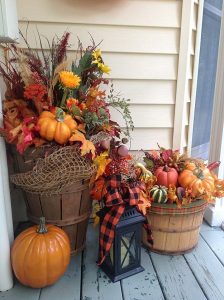
Keep the spirit of Thanksgiving in the air with a display of your garden harvests. Even dried up corn stalks can add to the feel of a good harvest this season.
Butterfly Gardens!
Make your yard butterfly-friendly to bring color and movement to the landscape while aiding the pollination of flowers, fruit, and vegetable plants.
Unfortunately, urbanization and other development are shrinking butterflies’ natural habitat, leaving fewer places to feed, mate, and lay eggs. Here are some tips to reverse that trend.
- Butterfly gardens don’t have to be large. You can grow plants in containers on a patio or even in hanging pots and window boxes.
- Butterflies need the sun to maintain body temperature, so place your garden in the sunniest location possible.
- The key to attracting butterflies is to provide them with lots of nectar sources; they also prefer to feed on open, tube-shape flowers. See our article on Plants that Attract Butterflies.
- All butterflies start out as caterpillars that require host plants on which to feed. Many of these are native plants—weeds and wildflowers that may already be growing on or near your property. Some good choices include clovers, milkweeds, and violets.
- After a rain, you may see butterflies congregating around a puddle or damp area in the garden to drink and extract minerals from the soil. Maintaining a puddle in the same spot will keep butterflies coming back.

Butterfly gardening has become big business. Butterfly farms offer live butterflies to release at special occasions, especially weddings.
Healthy Soil, Healthy Plants
HEALTHY SOIL, HEALTHY PLANTS
The key to successful gardening is “healthy soil.” This basic principle of organic gardening applies to all plants. Quite simply, when you feed the soil the proper nutrients, you let the soil feed the plants. So how do you “feed” the soil? First, you need to understand some elementary information about your soil and why it is so important, and then you can take steps to improve it.
To start, you should determine the soil texture by moistening the soil and rubbing it between your thumb and fingers to determine it’s “feel.” Sands are gritty and will barely hold together; clay can be squeezed into a firm shape; and silt will act in a way to allow particles to cling together. Sandy soils tend to dry out quickly because they contain high amounts of soil air. Oppositely, clay soils have a tendency to pack together, shutting out air and water. The best garden soil, “loam,” has moderate amounts of sand, silt and clay. Generally, soil in our area tends to be clayey. This condition can be improved by adding a soil conditioner, gypsum or slate particles. For sandy soils, humus should be added to help retain moisture and nutrients.
Next, you must evaluate the soil structure. Soil structure is affected by soil pH, the amount of humus and the combination of minerals in the soil. Ideal soils allow soil particles to clump together with air spaces between them for water drainage as well as oxygen consumption and carbon dioxide release from plant roots. The best way to improve soil structure is to add high amounts of organic matter like humus, dehydrated manure, composted manure, mushroom compost, alfalfa meal, peat moss, or worm castings.
You will also need to take a soil sample, to measure the pH and amounts of nitrogen, phosphorus and potassium in the soil as well as other nutrients. This will help determine exactly what the soil needs. Your local Master Nursery Garden Center will help you read the results and determine what to add to your soil and how much. Generally, a pH of 6.0 to 7.0 is acceptable. If your pH is lower than this, your soil is too acidic and requires lime to be added. If your soil is low in organic matter, it will often have a high pH level. All plants require a proper balance of nutrients – nitrogen (N), phosphorus (P) and potassium (K). Soils lacking any one of these elements will not produce healthy plants. Refer to the Organic Fertilizer Chart for suggested amendments.
When dealing with poor or improperly balanced soils, obtaining “healthy” soil may take two to five years to acquire. The best thing you can do to supplement your soil program is to use various organic fertilizers to meet your plants’ needs and regularly add organic matter; we suggest Bumper Crop Soil Amendments, and Fertilizers. Black Forest, Gardener’s Gold, Pay Dirt and Pay Dirt Plus are all excellent choices as soil amenders that will continue to help the soil structure as well as create biological activity that is also a vital part of developing productive soil.
Key Words
Soil Texture – The proportional amount of sand, silt and clay in the soil.
Soil Structure – The arrangement of soil particles in the soil.
Soil pH – The measurement of acidity or alkalinity of the soil.
Organic Matter – Various forms of living and dead plant and animal matter.