

Herbal Delights
Herbal Delights

No matter how cold the temperatures or how deep the snow, you can enjoy the pleasures of herbs this winter season by growing them in your windowsill. Herbs are great for adding zest to any food and are a delicious substitute for salt and artificial flavors. They can also make dinner a visual delight! Add herbs to breads, soups and stews for flavor or use as a lovely garnish. Here are some great selections to try…
Rosemary is a must for the cook. Fresh rosemary is much richer and more fragrant than dried sprigs. Its needle-like foliage has a piney or resinous aroma and flavor. Rosemary is good with any meat or poultry, with stronger tasting fish, and with pizza, breads and potatoes. It is companionable with garlic and citrus flavors. A pleasing apple jelly can be scented with rosemary for a gourmet touch.
Chives, being a member of the onion family, is one of the few flavoring plants that appreciates some fertilizer. The hollow spears should be cut as needed by clipping a few spears just above the ground. It is used mostly as a garnish or final ingredient wherever a light onion taste is wanted, and it won’t overpower your recipes.
Mints are a necessity for herb windowsill gardens. No one would want to be without spearmint and peppermint, and maybe orange mint, for fresh teas and additions to fruit cups and ice cream. Fragrant and luscious, mints also make delightful garnishes for drinks or can be frozen into ice cubes.
Sage is a standby for poultry, breads and stuffing and combines well with corn or apples. Fried leaves are good to nibble. Experiment with different types of sage to enjoy their subtle variations and different flavors.
Thyme, a huge family of small upright, mounding or creeping plants, comes in a variety of flavors. You will find varieties labeled French, English, Common and Lemon, with leaves that may be all green or silver-edged or even variegated with gold. Every herb garden should have some thyme, and it pairs will with lamb as well as in marinades and salads.
Oregano is the hardier cousin of marjoram. It is a familiar flavoring in Italian and Greek cooking, in meats, sauces and of course in pizza. Oregano can be added to salads, used in marinades or mixed in with breads for rich flavor without any butter needed.
When growing your herbs, be mindful of their sunlight needs and keep them away from heating vents that can dry the soil out too quickly. Use organic fertilizers like fish emulsion and seaweed sparingly. Although fertilizers make the plants beautiful to look at, the less fertilizer used on an herb, the better it will taste. Now is a great time to start growing or to add to your culinary herb collection. Winter is the perfect time to start adding zest and flavor to your cooking!
Planting Bulbs In The Winter
Plant bulbs are generally planted in the fall or spring, but in reality, they can be planted anytime so long as you can physically dig a hole. There are many types of bulb plants, including lilies, hyacinths, daffodils and tulips, just to name a few. While each plant is different, you can generally plant them in the same manner, but you should always adhere to the planting instructions that come with your specific bulbs.
Step 1
Plant your bulbs in early winter if possible. You cannot plant bulbs while the ground is frozen, so if it is, place your bulbs in a thick plastic bag called a poly bag, which is available at your local home and garden store. Then store them in a cool, dark and dry place like your garage. However, plant them as soon as possible when you can successfully dig some holes.
Step 2
Plan to plant bulbs about three to six inches apart, depending on the type of bulbs. For instance, tulips and daffodils spread and grow quickly and should be planted about six inches apart, but crocuses and snowdrops should be planted only three inches apart
Step 3
Plan to cluster your bulbs together. You can even mix varieties. Place smaller growing plants in front and larger ones in the back.
Step 4
Dig holes that are about five inches deep for small bulbs and eight inches deep for large bulbs. The diameter of the hole should be twice as large as the bulb.
Step 5
Put the bulbs in the ground with the pointed end facing up. This is the end from which the sprout will emerge.
Step 6
Mix some compost or peat moss in with the soil you just dug up. Use that new soil mix to cover the bulbs. Pat the soil down with your hands to avoid any air pockets.
Step 7
Mulch over the area. A couple inches of mulch will help keep your bulbs in the ground warm until spring when you may see the green sprouts begin to emerge and then bloom soon thereafter. If not, they should bloom the next season.
Tips on using rock salt in the Winter
5 Steps To Improving Results When Melting Ice
Step 1: Get rid of the snow. Sounds easy enough. Clear any snow accumulations using a shovel, broom or snow blower. Lets face it, you cant just throw salt on 8″ of snow and hope it melts.
Step 2: Apply it right. If you have one, use a spreader. A fertilizer spreader with wheels or handheld spreader ensures that you apply ice melt in a thin, even layer. Rinse the spreader between uses. Or sprinkle it on using an old coffee can with holes punched in the bottom. Always wear gloves if applying by hand. If you apply too much spread it out with a broom.
Step 3: Protect concrete, grass and shrubs when melting ice. Most of the damage to concrete surfaces is caused by using too much ice melt and, especially for concrete, the freeze/thaw cycle that they’re subjected to. If your concrete is less than a year old, its not recommended to use rock salt or magnesium chloride products.
Follow the application amount on the packaging. If you’re concerned about surface damage, consider kitty litter, playsand, or sawdust. Avoid spreading ice melt close to plants and shrubs and getting too much on your lawn.
Step 4: Protect your family and neighbors. Ice melt pebbles are most commonly brought into the house by winter boots and shoes. If you have small children or toddlers, be sure you are cleaning off your shoes before coming into the house.
If anyone ingests ice melt, call 911 or the American Association of Poison Control Centers (800-222-1222). before visiting the ER because they’re equipped to handle these exposures.
Step 5: Protect your pets. Pets can develop dryness and irritation on their paws and skin if they walk through ice melting products. Pets can also develop mouth irritation if they eat the chemicals or the resulting water. Consider using a salt-free ice melt that is safe for pets.
Insect Control Begins Now
It’s hard to think of insects in winter, but don’t forget the havoc these tiny creatures can bring to your garden – defoliating leaves, contaminating produce, even destroying complete plants. Before these pests begin to be a problem is the perfect time to take steps to control them.
Why Winter Control?
Late winter is the right time to control insects for two reasons. First, the insects and their eggs are just coming out of dormancy. The shells and protective coverings are softer and more porous in late winter, and so are more vulnerable to the effects of oils and sprays. Second, the oil-water mixture should not freeze on the tree or plants, which could damage the plant and make the spray far less effective. When you spray, the temperature should be above 40 degrees. Delay spraying if freezing night temperatures are predicted. Choose a calm day for spraying to be sure stray breezes and cross winds do not spread the spray to plants you don’t want covered.
Insects to Control
In late winter, before any leaf buds begin to open, spray Bonide All-Season Oil or Dormant Oil Spray on fruit trees or other ornamental trees or shrubs to suffocate over-wintering aphids, thrips, mealybugs, whitefly, pear psylla, scale and spider mites that cling to the bark. The treatment will also destroy the eggs of codling moths, Oriental fruit moths and assorted leaf rollers and cankerworms. Don’t wait until the buds have burst in early spring, as the coating of oil will also smother the emerging plant tissue.
Tree Spraying Tips
While small shrubs can be easy to treat, larger trees are more challenging to be sure you don’t leave any area untreated where insects can thrive. Spray the whole tree at one time, concentrating on the trunk, large branches and crotches, rather than spraying down a whole row of trees at one pass. If you’ve experienced extremely bad infestations of insects, you might treat your trees a second time. But be sure to spray before the buds are near the bursting point. Dormant oil can also be used after the leaves have dropped in the fall. Never spray when any foliage or fruit is on the trees or you risk unwanted pesticide contamination.
After you spray, be sure to store any remaining oil properly and out of reach of children and pets. Containers should be labeled clearly and kept in cool, dark spaces to preserve their usefulness. Avoid reusing any sprayers to minimize the risk of cross contamination or inadvertent use.
Spraying for insects in winter may not be the most glamorous job, but you’ll appreciate the improvement in your trees through the spring and summer when you’ve nipped your insect problems in the bud.
It’s hard to think of insects in winter, but don’t forget the havoc these tiny creatures can bring to your garden – defoliating leaves, contaminating produce, even destroying complete plants. Before these pests begin to be a problem is the perfect time to take steps to control them.
Why Winter Control?
Late winter is the right time to control insects for two reasons. First, the insects and their eggs are just coming out of dormancy. The shells and protective coverings are softer and more porous in late winter, and so are more vulnerable to the effects of oils and sprays. Second, the oil-water mixture should not freeze on the tree or plants, which could damage the plant and make the spray far less effective. When you spray, the temperature should be above 40 degrees. Delay spraying if freezing night temperatures are predicted. Choose a calm day for spraying to be sure stray breezes and cross winds do not spread the spray to plants you don’t want covered.
Insects to Control
In late winter, before any leaf buds begin to open, spray Bonide All-Season Oil or Dormant Oil Spray on fruit trees or other ornamental trees or shrubs to suffocate over-wintering aphids, thrips, mealybugs, whitefly, pear psylla, scale and spider mites that cling to the bark. The treatment will also destroy the eggs of codling moths, Oriental fruit moths and assorted leaf rollers and cankerworms. Don’t wait until the buds have burst in early spring, as the coating of oil will also smother the emerging plant tissue.
Tree Spraying Tips
While small shrubs can be easy to treat, larger trees are more challenging to be sure you don’t leave any area untreated where insects can thrive. Spray the whole tree at one time, concentrating on the trunk, large branches and crotches, rather than spraying down a whole row of trees at one pass. If you’ve experienced extremely bad infestations of insects, you might treat your trees a second time. But be sure to spray before the buds are near the bursting point. Dormant oil can also be used after the leaves have dropped in the fall. Never spray when any foliage or fruit is on the trees or you risk unwanted pesticide contamination.
After you spray, be sure to store any remaining oil properly and out of reach of children and pets. Containers should be labeled clearly and kept in cool, dark spaces to preserve their usefulness. Avoid reusing any sprayers to minimize the risk of cross contamination or inadvertent use.
Spraying for insects in winter may not be the most glamorous job, but you’ll appreciate the improvement in your trees through the spring and summer when you’ve nipped your insect problems in the bud.that cling to the bark. The treatment will also destroy the eggs of codling moths, Oriental fruit moths and assorted leaf rollers and cankerworms. Don’t wait until the buds have burst in early spring, as the coating of oil will also smother the emerging plant tissue.
Tree Spraying Tips
While small shrubs can be easy to treat, larger trees are more challenging to be sure you don’t leave any area untreated where insects can thrive. Spray the whole tree at one time, concentrating on the trunk, large branches and crotches, rather than spraying down a whole row of trees at one pass. If you’ve experienced extremely bad infestations of insects, you might treat your trees a second time. But be sure to spray before the buds are near the bursting point. Dormant oil can also be used after the leaves have dropped in the fall. Never spray when any foliage or fruit is on the trees or you risk unwanted pesticide contamination.
After you spray, be sure to store any remaining oil properly and out of reach of children and pets. Containers should be labeled clearly and kept in cool, dark spaces to preserve their usefulness. Avoid reusing any sprayers to minimize the risk of cross contamination or inadvertent use.
Spraying for insects in winter may not be the most glamorous job, but you’ll appreciate the improvement in your trees through the spring and summer when you’ve nipped your insect problems in the bud.
How To Heat A Small Room Inexpensively
These days with heating costs continuously on the rise we’re setting our thermostats lower in order to cut heating costs. Oh sure wearing an extra sweater is good but when you need a little extra warmth an you’re in a relatively small room then this actually works!
What you’ll need:
Tea light candles (beeswax is better for you and the environment)
Two clay pots, one smaller than the other so the larger one fits over
Loaf pan (glass or metal)
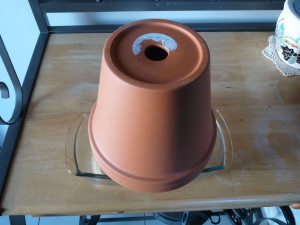
(Important – the small clay pot must not have a hole, if it does stuff it tightly with aluminum foil. The larger pot must have a hole.)
Instructions:
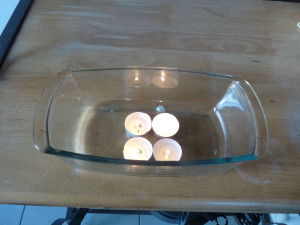
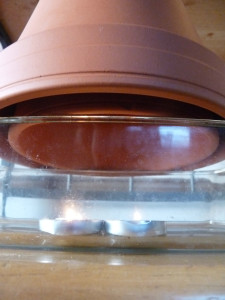
In the loaf pan place four tea light candles and light them. Position the smaller clay pot over the pan and then place the larger clay pot over the smaller one. The gap between the two pots enables a flow of air that then passes warm air around the room.
Light candles in a loaf dish.
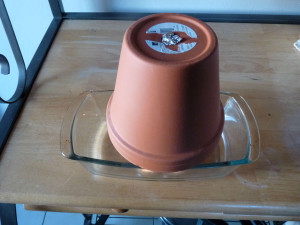
Place small clay pot over the candles.
Place large clay pot over the smaller one.
Enjoy!