

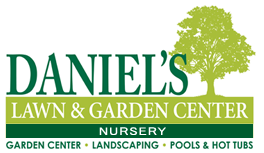
Small Space Container Gardening
 Container Gardening provides many advantages for today’s busy and space challenged gardeners. You can grow just about anything in containers that you can grow in the ground: annuals, perennials, bulbs, ornamental grasses, veggies & herbs, shrubs and even trees. Pots may be may rearranged, as you would furniture indoors, to suit your mood, entertaining needs or the season. Plant light requirement is less of a concern as lightweight planters, or containers on coasters, may be moved to follow the sun pattern. Container gardening brings the garden closer, right outside your door and up off the ground, requiring less bending and kneeling when tending. What could be easier?
Cold-Tolerant Flowering Plants
 Cold doesn’t have to kill your dreams for beautiful flowerbeds overflowing with vibrant color and stupendous blooms. While the deepest freezes of winter will put a stop to any flowering plant, there are beautiful plants that can chill out without damage or difficulty. The trick is recognizing which of these cold-tolerant flowering plants will work best in your climate and garden, and we’re here to help with that.
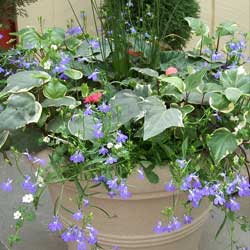
Freeze Tolerant Annuals
These are annuals that can withstand freezing temperatures and hard frosts for short periods with little or no injury. The best options include…
- Marguerite Daisy (Argyranthemum frutescens)
- Swan River Daisy (Brachycomb iberidifolia)
- Million Bells (Calibrachoa x hybrida)
- Dracaena Spike (Cordyline australis)
- Dusty Miller (Scenecio cineraria)
- Gazania (Gazania rigens)
- Nemesia (Nemesia fruticans)
- Cape Daisy (Osteospermum spp.)
- Petunia (Petunia x hybrida)
- Sweet Pea (Lathyrus odoratus)
- Verbena (Verbena x hybrida)
Semi-Hardy Annuals
These are annuals that are perennials in warmer zones and can actually overwinter in cooler areas during mild winters of if they are located in a warm, sunny, protected spot. These are very frost and freeze tolerant annuals…
- Annual Carnation (Dianthus caryophyllus)
- Annual Pinks (Dianthus chinensis)
- Pansy (Viola x wittrockiana)
- Purple Fountain Grass (Pennisetum setaceum ‘Rubrum’)
- Mealycup Sage (Salvia farinacea)
- Variegated Vinca Vine (Vinca major ‘Variegata’)
Perennials
Perennials are plants with roots that survive through the winter months, sending out new growth each spring. Appearing in your garden year after year, they become old and treasured friends. Perennials come in many sizes, shapes and colors with various bloom times and periods. It is best to plan your garden by the bloom time of the plant along with its cultural needs (sun/shade and drought-tolerant/water-lovers, etc.) to be sure you have a good, healthy balance of plants that will keep your garden and landscaping lush for months. Because these plants have evolved to survive the winter’s cold, they are all cold-tolerant to at least some measure. Popular favorites include…
- Dicentra ‘Luxuriant’ – No garden is complete without a patch of Bleeding Hearts. This fringed variety is longer blooming than the old-fashioned selections. Rose-pink flowers are borne gracefully above soft green foliage with a slight blue cast that looks fresh all summer. 18-24” tall. Plant in part shade.
- Bergenia – Spikes of delicate pink blooms soften the bold evergreen foliage of this early blooming perennial in March or April.
- Armeria (Sea Pink) – Another evergreen perennial, this bloomer sends out masses of papery pink or white flowers above grass-like clumps of foliage.
- Basket of Gold (Aurinia) – Charming yellow flowers float above dense mats of attractive gray foliage on this old-fashioned favorite. Plant in full sun. Excellent for a rock garden.
- Candytuft (Iberis) – Flat-topped clusters of white flowers cover this evergreen perennial in early spring. Excellent as an edging in a border or to use in a rock garden.
- Columbine (Aquilegia) – Beloved by hummingbirds and butterflies, columbine is also a great cut flower. Available in many color shades and bi-color combinations, columbine is perfect in any border or landscape situation.
- Coralbell (Heuchera) – Tiny bell flowers on 1-2’ slender stems bloom from spring into summer. Shades of foliage vary from green to pink to deep burgundy. Plant in sun or shade.
Not sure which plants are best for the cold in your yard? Stop in and see our landscaping experts today for help choosing just which blooms will heat up even on cold days!
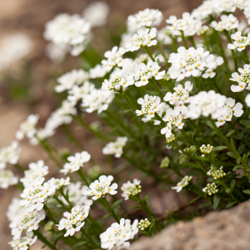
Azaleas – An American Favorite
 Azaleas are true garden favorite and are popular in all types of landscape designs. To keep them blooming prolifically and as beautiful as they can be, however, you will need to follow a few special directions for their best care.
Planting Azaleas
Azaleas need a well-drained location, as they will not thrive in an area that stays overly wet. They prefer afternoon shade, and too much sun can harm their leaves and fade the flowers, depleting their beauty. For their best growth, it is important to shelter azaleas from drying winds. The best locations in the landscape will be along the north, northeast or east side of a building or stand of evergreens or in the filtered shade under tall trees.
Azaleas may be planted any time of the year, even when in full bloom. Spring and early fall are ideal planting times so the plants are not stressed by the heaviest summer heat. Before planting, loosen the matted roots with a hand cultivator so they can spread and establish more easily.
To give azaleas the excellent drainage they require, they should be planted high, with half the root ball above the existing ground level in a hole at least twice as wide as the root ball. Amend the planting soil to provide good nutrition for these hungry plants. Once the plant is set in the planting hole, fill in around it with the planting mix, packing firmly to eliminate air pockets. Mound soil up to top of root ball. Water shrubs thoroughly with a diluted plant starter fertilizer to encourage root growth and help them establish more quickly. Mulch 2-3 inches deep over the planting hole, with mulch pulled away from plant stem to avoid insect infestations and rotting.
Watering Azaleas
Spring and summer plantings should be watered 2-3 times per week until fall the year they are planted, then once a week until Christmas. Plants may need to be watered as often as once a day if they are small or the weather is hot. Always check the soil moisture level before watering. It should be lightly moist several inches down, but if it is drying out more frequent watering may be needed. In following years you will need to water your azaleas about once a week unless there is a good soaking rain. Plants will need more water in hot summers and while in flower to keep their growth and form lush.
The Need for Mulch
Mulching around azaleas is always a good idea, and can help them thrive. A 2-4″ layer of mulch should be maintained at all times over the root area of the plant, but pulled away from the stems. This keeps the soil cool and moist, helps control weeds and protects roots in winter.
Pruning Azaleas
Azaleas rarely need to be pruned. When pruning is required it should be done immediately after blooming, since if you wait to prune until summer you may cut off next year’s blooms and miss an entire flowering season. Azaleas may be sheared, as they will send out new shoots anywhere on a branch, or you may choose hand-pruning to create a neater form.
With a bit of considerate care, azaleas can be a showstopper in your landscape. Stop by today for help choosing the best azaleas and learning all you need to know to keep them gorgeous year after year!
More Than Just Mulch
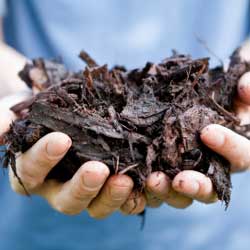 Not only does mulch add a decorative finish to your flower beds, it also keeps the soil cool and moist and thus reduces the need for watering. By using a pre-emergent herbicide with mulch, weed seeds are discouraged from germinating and growing. But which mulch should you use?
Types of Mulch
There are several types of mulch to choose from, and each type can give your landscaping a different finishing touch.
- Pine Bark and Nuggets
These types of mulches release acid when they break down. Pine mulches should be used around plants that need a more acidic soil. Use around azaleas, rhododendron, pieris japonica and holly. - Shredded Hardwood
This is by far the most popular mulch. It has a dark color and knits together well so that it does not wash away. This mulch is often available in different colors, including black, red and brown. - Cypress
This long-lasting mulch has a pleasant fragrance. Cypress mulch also knits together well, and it is thought to repel insects. - Artificial Mulch
Artificial mulches may look like bark, nuggets or hardwood shreds, but they are really shredded rubber or similar materials. They are often dyed in natural tones to mimic organic mulches, but could also be dyed in outrageous colors. These mulches do not break down and will not benefit the soil, but they do not need replacing as often as organic mulches that will eventually decompose. - Yard Waste
Many gardeners use yard waste such as shredded leaves, grass clippings or pine needles as mulch. While these can be effective mulches to conserve moisture and repel weeds, and they are certainly more economical, they do not have the refined look of wood mulches. Yard waste mulches will also decay and discolor much more quickly than wood mulches.
Using Mulch
No matter which mulch you choose, it is important to use it properly. It is recommended that mulch be applied 2-3 inches deep around plants, in flowerbeds and in garden areas – less depth will not be as effective to shield and protect the soil, while deeper mulch may actually protect too much and could restrict water from entering the soil. Take care not to pile mulch directly next to stems and trunks, which could invite insects and rot to invade the plant.
Over time, mulches will decay and compact, at which time they can be removed and added to a compost pile, or simply turned and worked into the soil around the plants they’ve been protecting. To preserve mulch a bit longer, raking and turning it over will refresh its color and reduce compaction.
Not sure which mulch will be best for your plants? Our experts will be happy to help you choose!
Growing Veggies in Containers
 Do you dream of a delicious, homegrown harvest but don’t have the land to use? No longer should a shortage of garden space prevent you from growing your own fresh vegetables. As long as you have a sunny location you can have your own mini-farm on your porch, patio, deck, balcony, roof-top or doorstep!
Why Use Containers?
The benefits of growing containerized vegetables go beyond the issue of space. There are plenty of other compelling reasons to plant your veggies in pots, including…
- Vegetables are amazingly ornamental and can be just as decorative as any other container plants or flowers.
- There are fewer problems with pests such as groundhogs, deer and rabbits and soil borne diseases.
- The soil in pots warms up more quickly in the spring allowing for earlier planting and an extended growing season.
- Less bending, squatting and kneeling is required for gardeners with limited mobility.
Vegetables can be grown in any vessel that can hold soil, has adequate drainage and is large enough to hold a plant. There are endless options available on the market or you may recycle items that you already have as long as they meet these requirements. Use your imagination – try a wheelbarrow, wine barrel or just a plastic bin, and you’re ready to plant!
Best Vegetables for Containers
While all veggies can be grown in containers, some are better suited than others. Plants that grow particularly large, that sprawl or that must be grown in large numbers to ensure an adequate yield may take more effort and careful site planning with an adequate container. Similarly, vining plants need not be avoided. Trellis these plants up against a wall or fence or allow them to cascade down from a taller pot or a container placed up high like on a stone wall. For smaller selections, a hanging basket or window box may be used. Many sprawling and vining vegetables are now available by seed in dwarf, compact or bush varieties. These are bred specifically for small spaces and containers and are worth seeking out.
Tips for Container Vegetable Gardens
Growing vegetables in containers does take some unique thought and isn’t quite the same as planting in a traditional garden. When planning your delicious container garden, consider…
- Containers: Size matters when planting in containers. The bigger the container, the more soil it can hold. More soil more and more moisture means less watering. Take note that porous containers like terra cotta dry out more quickly and will therefore require more frequent watering.
- Soil: When planting, choose a good quality potting mix. Soil from the ground may contain insects or disease or may be too heavy. Add an all-purpose balanced fertilizer at time of planting. It is also good idea to mix water absorbing polymers into the soil. These granules can hold up to 400 times their weight in water and help reduce watering from 30-50 percent.
- Plants: Some of the vegetables that you select may be directly seeded into your container; these would include peas, beans, radishes and corn. With most vegetables you may wish to transplant seedlings into your container, either home-grown or garden center purchased. You will generally find a wider selection of vegetable varieties and unique options available in seed as opposed to purchased seedlings, if you want to use your containers experimentally.
- Supports: Supports should be placed at time of planting for large or vining plants. This will ensure the young plants are not disturbed or damaged with supports added at a later time. If the supports are outside the container, however, they can be added only when they are needed.
- Location: Your vegetables will require at least 6 hours of direct sun a day. If this is not possible you may try placing your pots on dollies or carts and moving them to a sunnier location as the sun moves throughout the day. Note that good air circulation is important for disease control.
- Watering: Test soil frequently for water to make sure that you keep it evenly moist. Water the soil, not the plants, to avoid the spread of disease. Check soil moisture more frequently during the summer months when evaporation is faster. Mulching your containers with salt hay or grass clippings will help keep soil cool during the summer months and reduce the frequency of watering. If possible, a drip system can be a great option for keeping containers watered.
- Fertilization: Fertilizer leaches through pots quickly. Fertilize containerized vegetables at least once a week with a water soluble fertilizer. Always be careful to follow the directions on the fertilizer package and follow the recommended rate. Too much fertilizer may burn or kill your plants, but too little will result in undernourished, underperforming plants.
With appropriate care that caters to the needs of containers, your small-scale vegetable garden can be just as lush and productive as any larger, more intensive space, and you’ll soon have a bountiful harvest to enjoy.