


How To Select The Perfect Christmas Tree
Step 1: Choose the Right Tree
 Selecting the perfect tree is essential when it comes to decorating for Christmas. Get the best tree you can to ensure it lasts and looks great the entire holiday season. There are a lot of Christmas tree options out there from which to choose. Here are some examples of the most common trees out there at hardware stores and garden centers.
- Douglas Fir. These are the most common trees available. The trees are tall, slender and aromatic and their needles are short, soft and bluish-green. They need plenty of water to avoid shedding.
- Scotch Pine. Another common tree type. Scotch pines are the #1 sold Christmas tree in the U.S. They have very sturdy branches and also retain their needles better and last longer than some species. Needles are dark green.
- Blue Spruce. These trees have stiff needles that are a silvery green color. When watered adequately, these trees can last for a month and still look great.
- Fraser Fir. An attractive tree with green-and-silver, two-toned needles with good needle retention. Often referred to as the “no shed” tree.
If you are cutting your own Christmas tree, there are likely many tree farms in your area that will allow you to choose a tree and cut it down yourself. If you’ll be cutting your own, be sure you leave the house with a hand saw, some twine, a blanket for when you strap the tree to your vehicle and some gloves to protect your hands.
If you will be buying a pre-cut tree, make sure it is freshly cut. Touch the needles and branches to see if a significant amount comes off in your hand. Lightly bang the base of the tree on the ground; if an excessive amount of needles falls off, the tree is not fresh. Test the limbs to see if they are sturdy enough to hold the weight of ornaments. Also, if the tree is fresh, you should be able to smell the tree’s fragrance easily. The tree should be a dark green color all over with no areas of brown needles. Check to be sure that the bottom of the tree trunk is sticky with resin. Needles should not break when bent between your fingers. As when cutting down a tree yourself, bring twine and a blanket for strapping the tree to the top of your car, if you don’t have a truck or similar vehicle with room to stow the tree for the trip to your home.
-
Step 2: Find the Right Spot
Find the right location for your tree. A little forethought will help avoid any problems once you have your tree and start decorating for Christmas. Take the time to measure the dimensions of your room. Use a measuring tape to check the height, bearing in mind the dimensions of your tree stand. It’s a good idea to leave at least 6″ from the ceiling to the top of your tree. Don’t forget to ensure that the room is wide enough for the size of tree you want if you’re going to place the tree in a corner or alcove. Write these measurements down. Take your tape measure with you when you go to purchase the tree to be sure the Christmas tree you select will fit.
When you get your new tree home, be sure to put it into a bucket of water as you prepare to erect it. Don’t place the tree in high-traffic areas where it could get knocked over by children or pets, or where your family could trip over tree light electrical cords. Trees are usually best placed in a corner or in front of a window for optimal effect.
Safety Alert!
Never place your Christmas tree near a heat source, such as a radiator or fireplace, as this can present a fire hazard.
Helpful Tip
Consider anchoring the tree to a wall with a thin rope or heavy-duty string and an eyebolt as an added safety feature to help stabilize the tree. You can use this safety feature and easily hide it so it doesn’t detract from your tree’s appearance.
-
Step 3: Give It Water
Water your tree daily to keep your tree alive. Keep the tree stand filled with water at all times. The average tree can soak up to a gallon of water a day. When choosing a tree stand, be sure to find out how much water the stand holds when a tree is in it. Consider using Tree Preserve, a water additive that extends the life of the tree, keeps it greener longer, and helps prevent the needles from drying out. Remember, a thriving tree stays green longer and it makes it less of a safety hazard, as water keeps the tree moist and more fire-resistant.
Safety Alerts!
A dry tree can be a fire hazard. Before stringing lights on the tree, make sure the bulbs and the light string itself is in working order and intact without fraying or tears. Use lights rated for indoor use only. Do not place the tree directly in front of a heat or air conditioning duct as this will dry out the needles faster.
When the tree is plugged in, be careful when watering to avoid electric shock.
-
Step 4: Decorate It
Decorate the tree the way you want. This is the fun part! When adding lights to your Christmas tree, work from the inside, close to the tree trunk and out toward the tips of the branches. When you reach the tip of a branch, wrap your way back toward the trunk. Mini lights and C7 Christmas lights are typically used to decorate indoor trees.
Helpful Tip
Consider using LED holiday lights. They’re more efficient than regular light strings and don’t put off as much heat.
-
Step 5: Recycle It
Dispose of your tree properly after the holiday season—don’t just throw out your tree with the trash. Recycle or mulch it yourself. Many municipalities have recycling centers where you can take your tree or have it picked up for recycling. Check with your local officials to see what options are available.
Happy holidays! With good care, a Christmas tree can easily stay fresh for a month or even longer.
Your Guide To Successful Planting This Spring
Planting Trees & Shrubs

Before You Plant
Always plant in a well drained soil. To test for soil drainage, dig a hole for your new plant and fill it with water. If the water doesn’t drain in 12 hours, the soil in that area will need to be amended dramatically.
What Plant Form are You Transplanting?
Your tree or shrub will come in two forms: Balled and burlapped (B&B); or containerized. Containerized or B&B plants can be planted any time the ground is not frozen. If possible plant your tree or shrub as soon as you get it home. Otherwise, it may dry out and become injured. If you can’t plant it immediately, place it in a shady and/or sheltered location. Keep the soil moist until planted.
The Planting Hole
To plant your tree or shrub dig a hole twice as wide as the diameter and 6”-8” deeper than the root ball, replacing the 6”-8” of soil with enriched backfill. Compact this 6”-8” of soil. Once the plant is placed in the hole, the top of the root ball should be slightly above or level with the surface of the ground. Placing Your Plant in the Hole Remove all tags, wires or ropes from the stems or trunk, and do the following: Balled & Burlapped Plants: DO NOT remove the wire basket. Once the enriched soil has been placed ¾ of the way up the
Placing Your Plant in the Hole

Remove all tags, wires or ropes from the stems or trunk, and do the following:
Balled & Burlapped Plants
DO NOT remove the wire basket. Once the enriched soil has been placed 3/4 of the way up the root ball, cut & fold down the top 1/4 of the basket & burlap, remove any strings around the tree trunk. Fill the remaining hole with enriched soil to its original level.
Container Plants
Ease the pot off without disturbing the root ball. If the roots are extremely compacted, you may need to make a few shallow cuts through the roots on the side and bottom of the root ball.
Enriching Your Soil & Backfilling
Mix the soil taken out of the hole with Bumper Crop then backfill around the root ball. Tamp the soil lightly every 2”-3”, and fill the hole with the enriched soil to its original level. Use excess soil to build a ring 6” –10” from the outside of the hole. This will help the water to move slowly down to the root zone of the plant as well as minimize the runoff.
Watering
Water your newly planted tree or shrub by using a slow, deep watering method. B&B and container plant roots dry out faster than the soil around them, so it is important to monitor their soil moisture. Water slowly to attain deep water penetration which encourages widespread root development. You will need to water once every 7-10 days (or more during hot dry periods). Apply Root Master B1 after every watering
 General Watering guidelines:
1 gal. Pot – trickle water for approx. 15-20 minutes
2 gal. Pot – trickle water for approx 30-40 minutes
3 gal. Pot – trickle water for approx 40-50 minutes
4 gal. To 7 gal. – trickle water for approx 60 minutes
B&B – trickle water for 60-70 minutes
Remember, if it rains for 1 hr, it probably was not enough water for a newly planted shrub or tree.
 Water your plants thoroughly, then remove them from their pots by inverting them and supporting the root ball. If the roots are compacted, you may need to make a few shallow cuts through the roots on the side and bottom of the root ball. Place your plant into the hole. Add the enriched soil to ground level. Water the plant thoroughly to ensure the soil fills in completely around the roots, eliminating air pockets. Apply Rootmaster B1 at this time. Reapply Rootmaster B1 at every watering for the first year. Monitor your plants daily. Water slowly to attain deep water penetration which encourages widespread root development. Feed perennials bi-weekly with Bud & Bloom fertilizer. Add a 2”- 3” mulch layer around the plant. This will prevent water loss and keep mowers & trimmers from getting too close to the plant. Avoid overly deep mulch against the stem or trunk of the plant, as this can promote disease or pest injury.
Staking
Unless necessary, trees should not be staked. If your tree or shrub is top heavy or in an exposed area, you may stake the plant to anchor the root ball so roots can develop rapidly into the new soil around the tree. Connect the stakes to the trunk with flexible lines and straps designed for this use. Allow for some movement in the plant for strong growth. Remove the stakes and lines after one growing season so you do not inhibit trunk development.
Mulching
 Add a 2”-3” layer of shredded mulch or chips around the plant. This will prevent water loss and keep mowers and trimmers from getting too close to the plant. Avoid overly deep mulch against the trunk or stem of the plant as this can promote disease or pest injury.
Planting Perennial & Annual Plants

Plant your plants around your planting area while still in their pots. Make sure you have taken into consideration the mature height of the plants as well as the sun or shade requirements. Determine an appropriate location for planting, then dig a hole2 times the width & 6”-8” deeper, replacing with enriched soil (compact this 6”-8” of soil) Add a generous amount of Bumper Crop to enrich the soil. Blend into the soil.
For Successful Planting
 Bumper Crop
An all-organic soil builder with high organic nutrient content and endo- and ecto-mycorrhizal fungi.
Master Start
A fertilizer for all new plantings of sod or seeded lawns, shrubs, ground covers, flowers, or bare root plantings. Provides the right nutrient mix to develop a sturdy root system and strong top growth.
Root Master B1
Formulated to reduce plant shock and improve resistance to stress. Improves water and nutrient uptake.
Planting Trees and Shrubs
Before You Plant
Always plant in a well drained soil. To test for soil drainage, dig a hole for your new plant and fill it with water. If the water doesn’t drain in 12 hours, the soil in that area will need to be amended dramatically.
What Plant Form are You Transplanting?
Your tree or shrub will come in two forms: Balled and burlapped (B&B); or containerized. Containerized or B&B plants can be planted any time the ground is not frozen. If possible plant your tree or shrub as soon as you get it home. Otherwise, it may dry out and become injured. If you can’t plant it immediately, place it in a shady and/or sheltered location. Keep the soil moist until planted.
The Planting Hole
To plant your tree or shrub dig a hole twice as wide as the diameter and 6”-8” deeper than the root ball, replacing the 6”-8” of soil with enriched backfill. Compact this 6”-8” of soil. Once the plant is placed in the hole, the top of the root ball should be slightly above or level with the surface of the ground. Placing Your Plant in the Hole Remove all tags, wires or ropes from the stems or trunk, and do the following: Balled & Burlapped Plants: DO NOT remove the wire basket. Once the enriched soil has been placed ¾ of the way up the
Placing Your Plant in the Hole
Remove all tags, wires or ropes from the stems or trunk, and do the following:
Balled & Burlapped Plants
DO NOT remove the wire basket. Once the enriched soil has been placed 3/4 of the way up the root ball, cut & fold down the top 1/4 of the basket & burlap, remove any strings around the tree trunk. Fill the remaining hole with enriched soil to its original level.
Container Plants
Ease the pot off without disturbing the root ball. If the roots are extremely compacted, you may need to make a few shallow cuts through the roots on the side and bottom of the root ball.
Enriching Your Soil & Backfilling
Mix the soil taken out of the hole with Bumper Crop then backfill around the root ball. Tamp the soil lightly every 2”-3”, and fill the hole with the enriched soil to its original level. Use excess soil to build a ring 6” –10” from the outside of the hole. This will help the water to move slowly down to the root zone of the plant as well as minimize the runoff.
Watering
Water your newly planted tree or shrub by using a slow, deep watering method. B&B and container plant roots dry out faster than the soil around them, so it is important to monitor their soil moisture. Water slowly to attain deep water penetration which encourages widespread root development. You will need to water once every 7-10 days (or more during hot dry periods). Apply Root Master B1 after every watering
General Watering guidelines:
1 gal. Pot – trickle water for approx. 15-20 minutes
2 gal. Pot – trickle water for approx 30-40 minutes
3 gal. Pot – trickle water for approx 40-50 minutes
4 gal. To 7 gal. – trickle water for approx 60 minutes
B&B – trickle water for 60-70 minutes
Remember, if it rains for 1 hr, it probably was not enough water for a newly planted shrub or tree.
Water your plants thoroughly, then remove them from their pots by inverting them and supporting the root ball. If the roots are compacted, you may need to make a few shallow cuts through the roots on the side and bottom of the root ball. Place your plant into the hole. Add the enriched soil to ground level. Water the plant thoroughly to ensure the soil fills in completely around the roots, eliminating air pockets. Apply Rootmaster B1 at this time. Reapply Rootmaster B1 at every watering for the first year. Monitor your plants daily. Water slowly to attain deep water penetration which encourages widespread root development. Feed perennials bi-weekly with Bud & Bloom fertilizer. Add a 2”- 3” mulch layer around the plant. This will prevent water loss and keep mowers & trimmers from getting too close to the plant. Avoid overly deep mulch against the stem or trunk of the plant, as this can promote disease or pest injury.
Staking
Unless necessary, trees should not be staked. If your tree or shrub is top heavy or in an exposed area, you may stake the plant to anchor the root ball so roots can develop rapidly into the new soil around the tree. Connect the stakes to the trunk with flexible lines and straps designed for this use. Allow for some movement in the plant for strong growth. Remove the stakes and lines after one growing season so you do not inhibit trunk development.
Mulching
Add a 2”-3” layer of shredded mulch or chips around the plant. This will prevent water loss and keep mowers and trimmers from getting too close to the plant. Avoid overly deep mulch against the trunk or stem of the plant as this can promote disease or pest injury.
Planting Perennial & Annual Plants
Plant your plants around your planting area while still in their pots. Make sure you have taken into consideration the mature height of the plants as well as the sun or shade requirements. Determine an appropriate location for planting, then dig a hole2 times the width & 6”-8” deeper, replacing with enriched soil (compact this 6”-8” of soil) Add a generous amount of Bumper Crop to enrich the soil. Blend into the soil.
For Successful Planting
Bumper Crop
An all-organic soil builder with high organic nutrient content and endo- and ecto-mycorrhizal fungi.
Master Start
A fertilizer for all new plantings of sod or seeded lawns, shrubs, ground covers, flowers, or bare root plantings. Provides the right nutrient mix to develop a sturdy root system and strong top growth.
Root Master B1
Formulated to reduce plant shock and improve resistance to stress. Improves water and nutrient uptake.
Insect Control Begins Now
It’s hard to think of insects in winter, but don’t forget the havoc these tiny creatures can bring to your garden – defoliating leaves, contaminating produce, even destroying complete plants. Before these pests begin to be a problem is the perfect time to take steps to control them.
Why Winter Control?
Late winter is the right time to control insects for two reasons. First, the insects and their eggs are just coming out of dormancy. The shells and protective coverings are softer and more porous in late winter, and so are more vulnerable to the effects of oils and sprays. Second, the oil-water mixture should not freeze on the tree or plants, which could damage the plant and make the spray far less effective. When you spray, the temperature should be above 40 degrees. Delay spraying if freezing night temperatures are predicted. Choose a calm day for spraying to be sure stray breezes and cross winds do not spread the spray to plants you don’t want covered.
Insects to Control
In late winter, before any leaf buds begin to open, spray Bonide All-Season Oil or Dormant Oil Spray on fruit trees or other ornamental trees or shrubs to suffocate over-wintering aphids, thrips, mealybugs, whitefly, pear psylla, scale and spider mites that cling to the bark. The treatment will also destroy the eggs of codling moths, Oriental fruit moths and assorted leaf rollers and cankerworms. Don’t wait until the buds have burst in early spring, as the coating of oil will also smother the emerging plant tissue.
Tree Spraying Tips
While small shrubs can be easy to treat, larger trees are more challenging to be sure you don’t leave any area untreated where insects can thrive. Spray the whole tree at one time, concentrating on the trunk, large branches and crotches, rather than spraying down a whole row of trees at one pass. If you’ve experienced extremely bad infestations of insects, you might treat your trees a second time. But be sure to spray before the buds are near the bursting point. Dormant oil can also be used after the leaves have dropped in the fall. Never spray when any foliage or fruit is on the trees or you risk unwanted pesticide contamination.
After you spray, be sure to store any remaining oil properly and out of reach of children and pets. Containers should be labeled clearly and kept in cool, dark spaces to preserve their usefulness. Avoid reusing any sprayers to minimize the risk of cross contamination or inadvertent use.
Spraying for insects in winter may not be the most glamorous job, but you’ll appreciate the improvement in your trees through the spring and summer when you’ve nipped your insect problems in the bud.
It’s hard to think of insects in winter, but don’t forget the havoc these tiny creatures can bring to your garden – defoliating leaves, contaminating produce, even destroying complete plants. Before these pests begin to be a problem is the perfect time to take steps to control them.
Why Winter Control?
Late winter is the right time to control insects for two reasons. First, the insects and their eggs are just coming out of dormancy. The shells and protective coverings are softer and more porous in late winter, and so are more vulnerable to the effects of oils and sprays. Second, the oil-water mixture should not freeze on the tree or plants, which could damage the plant and make the spray far less effective. When you spray, the temperature should be above 40 degrees. Delay spraying if freezing night temperatures are predicted. Choose a calm day for spraying to be sure stray breezes and cross winds do not spread the spray to plants you don’t want covered.
Insects to Control
In late winter, before any leaf buds begin to open, spray Bonide All-Season Oil or Dormant Oil Spray on fruit trees or other ornamental trees or shrubs to suffocate over-wintering aphids, thrips, mealybugs, whitefly, pear psylla, scale and spider mites that cling to the bark. The treatment will also destroy the eggs of codling moths, Oriental fruit moths and assorted leaf rollers and cankerworms. Don’t wait until the buds have burst in early spring, as the coating of oil will also smother the emerging plant tissue.
Tree Spraying Tips
While small shrubs can be easy to treat, larger trees are more challenging to be sure you don’t leave any area untreated where insects can thrive. Spray the whole tree at one time, concentrating on the trunk, large branches and crotches, rather than spraying down a whole row of trees at one pass. If you’ve experienced extremely bad infestations of insects, you might treat your trees a second time. But be sure to spray before the buds are near the bursting point. Dormant oil can also be used after the leaves have dropped in the fall. Never spray when any foliage or fruit is on the trees or you risk unwanted pesticide contamination.
After you spray, be sure to store any remaining oil properly and out of reach of children and pets. Containers should be labeled clearly and kept in cool, dark spaces to preserve their usefulness. Avoid reusing any sprayers to minimize the risk of cross contamination or inadvertent use.
Spraying for insects in winter may not be the most glamorous job, but you’ll appreciate the improvement in your trees through the spring and summer when you’ve nipped your insect problems in the bud.that cling to the bark. The treatment will also destroy the eggs of codling moths, Oriental fruit moths and assorted leaf rollers and cankerworms. Don’t wait until the buds have burst in early spring, as the coating of oil will also smother the emerging plant tissue.
Tree Spraying Tips
While small shrubs can be easy to treat, larger trees are more challenging to be sure you don’t leave any area untreated where insects can thrive. Spray the whole tree at one time, concentrating on the trunk, large branches and crotches, rather than spraying down a whole row of trees at one pass. If you’ve experienced extremely bad infestations of insects, you might treat your trees a second time. But be sure to spray before the buds are near the bursting point. Dormant oil can also be used after the leaves have dropped in the fall. Never spray when any foliage or fruit is on the trees or you risk unwanted pesticide contamination.
After you spray, be sure to store any remaining oil properly and out of reach of children and pets. Containers should be labeled clearly and kept in cool, dark spaces to preserve their usefulness. Avoid reusing any sprayers to minimize the risk of cross contamination or inadvertent use.
Spraying for insects in winter may not be the most glamorous job, but you’ll appreciate the improvement in your trees through the spring and summer when you’ve nipped your insect problems in the bud.

Fall Is A Great Time For Planting Trees & Shrubs

There is a false perception in the gardening world that fall is the end of the growing season. In fact, it is quite the contrary. Fall is an ideal season for planting trees, shrubs and other assorted plants. The key is encouraging good root growth. Planting trees and shrubs in fall enables the root systems to grow before the hot summer returns.
Smaller plants will be established before winter sets in, and get a head start over shrubs in the spring. Larger plants will also get a head start since a general rule of thumb is one year per one inch of trunk diameter.
Fall officially begins with autumnal equinox in late September. The ideal time to begin planting trees and shrubs is six weeks before the first sign of hard frost. September through November is the ideal time for tree planting because it allows the roots to become established before the ground freezes and winter sets in. However, it is highly recommended that you do not continue planting trees too late into the fall because this can have a negative impact on plant health.
Cooler, wetter weather is the perfect time for tree planting. With an increase in rainfall and cooler temperatures in the fall, less watering is needed. As tree shoot growth halts, the trees require less water because the days are cooler and shorter and the rate of photosynthesis decreases. Stable air temperatures also promote rapid root development. Soils stay warm well after the air temperature cools, also encouraging root growth. During shoot dormancy, trees grow to establish roots in new locations before warm weather stimulates top growth.
There are several benefits to fall planting. Trees planted in the fall are better equipped to deal with heat and drought in the following season. Another great reason to plant your shrubs in the fall is because you can pick your trees and shrubs by the fall color they produce. Avoid planting broad leaved evergreens in the fall such as rhododendrons, azaleas, boxwoods and hollies. If planted, provide them with protection from winter winds and have them treated with an anti desiccant. Some tree species that are recommended for fall planting include the maple, buckeye, horse chestnut, alder, catalpa, hackberry, hawthorn, ash, honey locust, crabapple, amur corktree, spruce, pine, sycamore, linden and elm.
Article from saveatree.com
PROTECTING OUR POLLINATORS
Every garden requires pollinators, and bees are among the finest. Without them there would be limited flowers and far fewer fruits and vegetables. Did you know that about 30% of the food we eat depends on the pollination of bees?
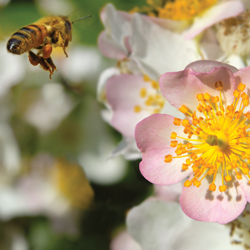
Although there are many bees that are great pollinators, like carpenter, mining, sweat and cellophane bees, some of the most well know and easily identified bees are the honey and bumble bee. Both of these bees live in social colonies and are cavity nesters. Because these bees are active all summer long, they require a constant supply of floral nectar close to their hive. Some of the biggest threats to the continued and healthy existence of these two bees are habitat loss, which causes inadequate nesting and scarce food supplies, and pesticide drift.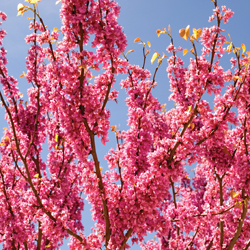
Bring more bees to your garden by planting a variety of native flowers that will bloom throughout the entire summer. Keep the bees in your garden by eliminating chemical use, especially while plants are in flower. Be kind to bees in your garden by providing a safe place for shelter and to lay their eggs. Make sure that there is an available water source for your bees. A birdbath works just fine.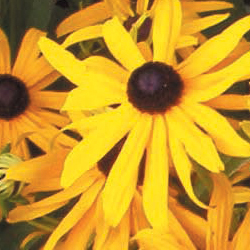
NATIVE PLANTS THAT ATTRACT BEES
Apple Malus
Aster Aster
Blackberry & Raspberry Rubis
Black-eyed Susan Rudbeckia
Blueberries Vaccinium
Currant Ribes
Elder Sambucus
Goldenrod Solidago
Highbush Cranberry Viburnum
Joe-pye weed Eupatorium
Lupine Lupinus
Penstemon Penstemon
Purple coneflower Echinacea
Redbud Cercis
Rhododendron Rhododendron
Sage Salvia
Stonecrop Sedum
Sunflower Helianthus
Willow Salix