


Winter Interest in the Garden
 Many gardeners think of the fourth season as a time for rest, but winter can be interesting and fun to plan for a bold, appealing landscape. While most of us plan our landscapes for bloom times in spring and summer, there are many plants offering color and texture appeal for the cold season landscape.
Winter Beauty in Your Landscape
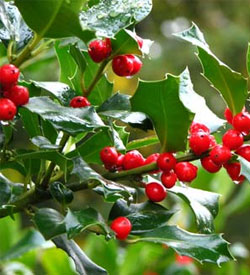
Winter is a time of special beauty and interest. Berries sparkle on shrubs under a layer of frost and ice, while other shrubs have shades of bronze leaves that cling and rattle in winter breezes. The leafless branches of larger trees cast dramatic shadows across the freshly fallen snow. Bark hidden by the leaves of summer stands out gorgeously in the winter. Barks of silvery gray, white, green, yellow, purple or red hues add a burst of color when the landscape is covered in white. Even barks that are deeply fissured, sleek as satin, peeling in thin layers or curiously pocked by a pitted surface give interest to a wonderful winter landscape. Dried grasses stand out in bright contrast against the backdrop of dark evergreens, shaking snow off their delicate heads. There is even the surprising yellow ribbon-like blooms of witch-hazel which flower in mid-winter or the delicate lavenders and blues of tiny species of crocuses under the snow. Pansies are also a great addition for late-season winter color in your flowerbeds. Everywhere you look, there can be beauty in the winter landscape.
Top Plants for Winter Interest
Many different plants offer interesting features that reach their full potential in the winter landscape. Popular options include…
- Paperbark Maple (Acer grisium)
- Threadleaf Japanese Maple (Acer palmatum dissectum)
- Red Chokeberry (Aronia arbutifalia)
- Shagbark Hickory (Carya ovata)
- Blue Atlas Cedar (Cedrus atlantica ‘Glauca’)
- Harry Lauder’s Walking Stick (Corylus avellana ‘Contorta’)
- Winter Dephne (Daphne odora)
- Common Snow Drops (Galanthus nivalis)
- Wintergreen (Gaultheria procumbens)
- Christmas Rose (Heleboris niger)
- Chinese witch-hazel (Hamamelis mollis)
- Winterberry Holly (Ilex verticillata) Need female and male plant for berries
- Christmas fern (Polystichun acrostichoides)
- Common Camellia (Camellia japonica)
- Heathers/Heaths
Not sure which plants will offer the beauty you want to see all winter long? Our experts are always happy to help you plan the best landscape design for all four seasons, so come in and share your ideas today and we’ll help you be prepared for an amazing winter landscape.
Low Light Houseplants
 Plants brighten up any room, help clean the air and bring a bit of nature inside, but indoor spaces rarely have the same levels of bright, natural light many plants enjoy in their native habitats. Without adequate light, a plant’s foliage may be dull or turn yellow or brown, growth will be slow and flowers may fail to bloom. Choosing low light houseplants is an ideal solution for any indoor space, and there are many beautiful plants that can thrive in a dim environment.
20 Best Houseplants for Low Light
There are many reasons to opt for low light houseplants. Some rooms, such as bedrooms and bathrooms, generally have lower than average light levels. Some homeowners use window shades, blinds or curtains for temperature control, which reduces the light available for indoor plants. Even bright rooms may have dim corners or shadowed spaces where light isn’t as intense. The exposure of any window also affects the sunlight it brings indoors, with north and west windows generally having lower light than south and east windows. Changing seasons also changes how much sunlight comes through any window, with less light available to indoor plants in fall and winter. Fortunately, there are many outstanding houseplants that can grow well in lower light conditions. While the best plants for your home will also vary based on humidity conditions and the care you can provide, houseplants that don’t mind lower light include:
- Begonia (Begonia)
- Bromeliads (Aechmea)
- Cast Iron Plant (Aspidistra)
- Chinese Evergreen (Aglaonema)
- Corn Plant (Dracaena fragrans)
- Dumb Cane (Dieffenbachia)
- Heartleaf Philodendron (Philodendron hederaceum)
- Lucky Bamboo (Dracaena)
- Maindenhair Fern (Adiantum)
- Parlor Palm (Chamaedorea elegans)
- Peace Lily (Spathiphyllum wallisii)
- Peperomia (Peperomia)
- Ponytail Palm (Beaucarnea recurvata)
- Pothos (Epipremnum aureum)
- Prayer Plant (Calathea)
- Rubber Plant (Ficus elastica)
- Snake Plant (Sansevieria)
- Spider Plant (Chlorophytum)
- Sword Fern (Polystichum munitum)
- ZZ Plant (Zamioculcas zamiifolia)
These are just a few of the most widespread, popular indoor plants that can do well with lower light levels. Check at your local nursery or garden center for additional varieties that are adapted to your region’s climate, especially during the winter months when houseplants are much more widely available.
Caring for Low Light Houseplants
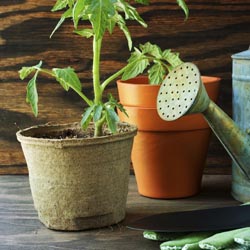
It is important to note that whatever type of houseplant you choose, a designation as “low light” does not mean the plant can thrive in darkness. All plants need some light, but low light plants can still thrive in indirect or filtered light rather than several hours of bright sunlight each day. To give your low light plant the very best indoor habitat, you will also need…
- A proper pot or other container.
The pot will need to be the right size for the plant and its anticipated growth, without being too big or too small. Adequate drainage is also essential to prevent root rot and other care difficulties. - Suitable soil or potting mix.
Garden soil has too many contaminants to be good for houseplants, but choose a soil with good nutrition for the type of plant it will nurture. Add coir, peat or other potting material if necessary to adjust the soil composition. - Proper watering.
Inadequate water or overwatering can both be deadly for houseplants. Know what water your plant needs and adjust the watering schedule based on the plant’s size and seasonal needs throughout the year. Watering gauges or automatic watering tools can help you be sure you aren’t drowning or drying out your houseplants. - Regular feeding.
Because houseplants rely on the same soil and can’t stretch their roots out to seek extra nutrition, regular fertilizing is essential. Choose the proper fertilizer for the plant type and feed gently rather than risk burning delicate roots with overfeeding. Slow-release fertilizers formulated for indoor plants are one of the best options. - Increased humidity.
Indoor air is often much drier than the air outside, and houseplants can dry out more quickly without the proper humidity. Adding a humidifier in a room with houseplants, grouping plants together, misting regularly and providing a humidity tray are all ways to help. - Occasional dusting.
With no regular breezes to blow away debris, houseplants can become dull and dingy without being dusted, and dust can clog their pores. Use a soft, clean cloth to gently wipe the foliage, or give plants an occasional shower to rinse away unwanted dust.
Every home can be made brighter with houseplants, even in darker rooms where there wouldn’t seem to be enough light. By choosing the right low light houseplants and caring for them appropriately, even a shadowy corner of your home can be a restful bit of nature.
October Gardening Checklist
Plant spring-blooming bulbs. Fertilize and water in well.
Divide daylilies and spring-blooming perennials, including iris and peonies.
Rake leaves from the lawn and lower the mower blade.
Check your compost pile. Now is a good time to add a bio-activator to help break down brown leaves and lawn clippings.
Dig up summer-flowering bulbs, such as dahlias, cannas, tuberous begonias, caladiums and gladiolus after the frost kills the top growth. Pack them in peat moss, and store them in a ventilated area for winter.
Fertilize your trees after the leaves fall.
Fertilize azaleas, rhododendron, and evergreens with an acid fertilizer and other shrubs with a general purpose food.
Set up bird feeders. Clean out birdbaths, refill and purchase heaters for the winter.
Clean up and destroy diseased rose leaves and debris surrounding shrubs and perennials. Mound 10-12 inches of dirt around roses to protect from winter damage. After the ground freezes, cover roses with mulch or straw.
Remove annuals, roots and all, and add to your compost pile, but do not add any diseased material to it.
Cut back perennials unless they feature ornamental seed heads and fertilize with 5-10-5 food.
Prune long raspberry and rose canes back to a height of three feet. Clean up your beds and gardens to avoid harboring insects and diseases over the winter.
Update garden records, noting successes and failures, gaps in planting, future planting and landscape changes.
Water all landscape plants well and mulch before the winter cold sets in.
Spray evergreens, azaleas, rhododendron, boxwood and rose canes with an anti-desiccant for protection against wind and cold weather.
Vegetable Gardening Tidbits
 Are you ready to make the most of your vegetable garden? Try these tips and tidbits for everything from easier weeding to stopping pests to enjoying a hearty harvest!
- Reducing Weeds
Minimize weeds in your garden by covering the soil between planting rows with mulch. Several sheets of moistened newspaper topped with hay or straw works very well, especially if you move your planting areas around a bit from year to year. You can even use carpet scraps placed upside-down. Landscape fabric topped with wood chips or gravel is a good choice if the walkways are permanent. Try to avoid the habit of tilling to remove weeds because this process brings up weed seeds from deeper in the soil and exposes them to the light they need to grow. - Increase Tomato and Pepper Production
Fruiting of your tomatoes and peppers may be improved by applying Epsom salts, which contain sulfur and magnesium. Apply one tablespoon of granules around each transplant, or spray a solution of one tablespoon Epsom salts per gallon of water at transplanting, first flowering and fruit set. You can find Epsom salts at drug and grocery stores. - Supporting Tomato Plants
Set your tomato supports in place before plants get too large. Smaller determinate (bushy) varieties can be supported with small cages, but larger indeterminate (vining) varieties need large cages or tall stakes. Secure cages with stakes so they don’t fall over as plants grow larger and heavier. - Growing Larger Tomatoes
Indeterminate tomato plants, such as ‘Better Boy’, will produce many suckers. A sucker is a new shoot that starts where a branch connects with the main trunk. Removing suckers will decrease the number of fruits produced, but the remaining tomatoes will be larger and will ripen sooner. - Ending Blossom End Rot
To minimize blossom end rot, keep soil evenly moist, apply a layer of mulch to conserve moisture, don’t over-fertilize (especially avoid high-nitrogen fertilizer) and avoid damaging plant roots while cultivating. Blossom end rot shows up as dark sunken spots on the blossom or non-stem end of tomatoes, peppers and squash. It’s caused by a calcium imbalance in the plant. The soil may have adequate calcium, but the plant isn’t able to take up enough to supply the rapidly developing fruit. - Stop Slugs and Snails
Slugs and snails may be deterred with coffee grounds, diatomaceous earth and even sharp gravel. Spread any of these materials in a ring around individual plants. Wrap pots with copper tape to keep slugs from crawling up. Inspect foliage and pick off any insects that have already passed the barriers. - Keep Cucumber Beetles at Bay
Young cucumber, melon and squash plants are easy prey for cucumber beetles. As the seedlings grow, these yellow-striped or spotted beetles emerge to feed on their foliage. The beetles also spread bacterial wilt disease. To control cucumber beetles use a portable vacuum cleaner to suck up them up in early evening, spray beneficial nematodes on the soil or try planting broccoli, calendula, catnip, nasturtium, radish, rue or tansy, which naturally repel these insects. If you want to try marigolds to repel them use the more pungent varieties like African, French or Mexican marigolds. The more common marigolds may actually attract these pests. - Plan for Late Summer Harvests
It’s not too late to sow lettuce, beets, carrots, radishes and other short-season crops for a late summer harvest. Shade lettuce, if possible, during late afternoon to keep young plants cooler, or grow them next to larger plants that provide some shade. You’ll need to water more often on these hot days than you did in spring and early summer, but you can easily extend their growing season for later harvesting. - Grow More Tomatoes, Zucchini and Beans
Harvest tomatoes, zucchini, beans and other fruiting crops frequently to encourage continued production. Don’t allow any fruits that you won’t be harvesting to remain on your plants, because when mature seeds are produced it’s a signal for the plant to slow down fruit production. Instead, consider sharing, selling, preserving or trading extra produce so you can continue to harvest and extend the growing season. - When to Harvest Herbs
Herbs are best harvested just as they are beginning to flower. That’s when they have the highest concentration of essential oils and flavor in their leaves. Harvest entire branches back to within a few inches of the main stem to encourage new, bushy growth. - Harvesting and Storing Onions
Begin harvesting onions when about half to three-quarters of the leaves have died back. Then gently dig or pull the onions and store them in a dry, shady place with good ventilation, such as an outdoor shed or barn, for 10-14 days. After the onions have cured, put them in slatted crates or mesh bags and store them indoors in an area with low humidity and temperatures between 33-45 degrees F. - Enjoying Green Tomatoes
When daytime temperatures no longer rise above 65 degrees F in late summer and early fall, it’s time to pick the green tomatoes. Wrap them individually in newspaper and let them ripen indoors, or try some fried or in other recipes that call for under-ripe tomatoes.
The Staycation
 More and more, it’s looking like this may be the year of the staycation. Overseas travel and community events are being discouraged as we are being asked to remain in place to avoid viral transmission. None of us is sure exactly what the future holds, but one thing is for sure, we need to take care of ourselves. These are stressful times and it’s a good idea to prepare now for the months ahead. Staying as healthy as possible and reducing stress will both be beneficial in helping us ride this storm out in the most positive light possible.
Staying Home
Staycations are not only necessary during times like these, but they are a great way to reduce our carbon footprint and save money as well. Now is the occasion to make your home and garden a sanctuary, a place that is enjoyable to spend your summer break this year.
Here are some helpful hints:
- Stay Healthy
Start your own vegetable garden to grow healthy, organic vegetables, fruits and herbs to keep your immune system strong. - Keep in Shape
Gardening is an excellent form of exercise that will not only improve muscle tone but, if performed at constant rate, activities such as raking and weeding can burn up to 300 calories per hour. - Preserve Positivity
Begin your day with yard yoga. It will clear your head, calm your worries, relieve your tensions to help you see the world and i’s current situation in a more positive light. Namaste. - Sustain your Spirits
“The earth laughs in flowers”-Ralph Waldo Emerson. So, plant lots of them! - Have Fun
Set up a few yard games like horseshoes, badminton, giant Jenga, corn hole, croquet or ladder Toss to pass the hours with family and close friends. - Remain Productive
Plan a comfortable area to keep- up with your work if you are able to do it from home. Make sure that you have a comfortable seating area to work and a little shade to reduce the glare on your computer screen. - Make a Joyful Noise
The buzz of bees, the song of birds, breeze blowing through leaves, the musical swish of water from a fountain, the crystal jingle from windchimes and the voices of family will all bring you moments of joy as you weather the storm. - Sweet Dreams
Evenings are perfect for sitting around the fire pit, eating s’mores and dreaming about where you will travel come next year.
Take care of yourself and those you love. A little forethought will go a long way in helping you have a great vacation at home this year. After all, home may be the most comfortable and safest place to be.
Watering: How Much?
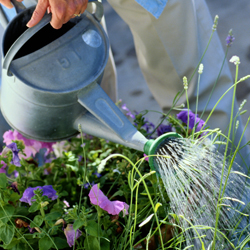 Water is critical for a healthy garden and landscape, but how much water is too much, how much isn’t enough and how much is just right? Unfortunately, there isn’t a specific answer that suits every gardener’s needs. All plants have different water requirements, which change depending on the type of soil, amount of sun, temperature, humidity, season, maturity of the plant and overall growing environment.
Initial Watering
All plants, including specimens described as drought tolerant, will require water when first planted. This is because many of the smaller roots responsible for water uptake are usually damaged during shipment and planting. Build a small circular soil wall around the plant to contain water while it percolates into the soil. Watch new plants carefully and keep them well-watered as their roots settle in and they adapt to their new or transplanted location.
Groups Are Good
It’s a good idea to have some knowledge of the plant’s water requirements when determining the location in the garden. It will keep watering simple if you plant a new specimen near other plants with similar water requirements. In this way, there is no need to readjust an irrigation system or watering schedule, since all the plants in the group have similar needs.
Need a Drink?
Because plants’ watering needs can change through the season, how can you tell if a plant needs more water? Most plants will wilt as the soil becomes too dry. The leaves may droop, and if it’s an upright plant, the top ends may become soft and bend over. Glossy plants may begin to look dull, while thick leaves will shrivel. If you notice these signs, it is time to water! Most plants will revive if watered quickly enough, but be sure to water deeply rather than allowing moisture to run off the surface.
How can you tell if you should water? Push your finger into the soil an inch or two from the base of a plant. Perfect soil should feel cool and slightly moist. Some soil should stick to your finger. If none does, it’s too dry. If it’s muddy, don’t water. Overwatering kills plants by depriving the roots of oxygen. Some gardeners use water meters to see the precise amount of moisture. If you’re unsure, this tool can be helpful.
Adjusting Your Watering Schedule
The amount you have to water your plants or landscape can change from day to day. A cool morning will allow more dew to form and drain to the soil, or a sudden afternoon thunderstorm can be enough water to keep your plants hydrated for a few days. An overly hot day, however, can rapidly deplete water resources and extra watering may be required. Check your plants and landscape regularly to be sure they are getting adequate water, and make adjustments as needed to keep them suitably moist without either too much or too little water.
Need help monitoring water? Stop by to see our collection of water gauges, meters and monitors that can help you be sure you are watering your landscape correctly.
Soil 101
 How well do you understand your soil? It’s more than just dirt, and the more you learn about soil, the better you’ll be able to care for it to ensure a stunning landscape, healthy lawn and productive garden.
All About Soil
The four elements of soil are minerals, water, air and organic matter. Different combinations of the four elements create the four main categories of soil: sand, silt, clay and loam. Of course, we all want loam – that rich, vibrant soil thriving with beneficial bacteria and with a smooth but crumbly texture ideal for root growth. Unfortunately, true loam soils are rare, especially around homes where topsoil was removed and heavy machines compacted the remaining soil during construction or renovation. Most of us have clay soil, which has finer particles that compact easily into a dense mass. Clay soils also retain more water and can easily become too soggy or waterlogged for healthy plants. But just because your soil may be clay, it doesn’t have to stay that way!
Improving Soil
Improving soil is actually quite easy. All soils are improved by adding minerals and organic material that help balance out the overall components of the soil’s structure.
Before adding minerals, test the soil to determine its pH (acidity or alkalinity) and determine any mineral deficiencies. Lime decreases soil acidity, gypsum adds calcium and helps break up heavy clay and sulfur increases acidity. Other soil amendments to add to a clay soil include sand, cottonseed meal and peat moss, all of which will help improve the drainage and structure.
Organic matter refers to plant or animal materials decomposed into compost or “humus.” This residue comes from leaves and other plant materials, as well as certain animal wastes. Grass clippings, paper and certain types of decomposing food can also be ideal compost. The quality depends on the origin of the original biodegradable matter. Many people make their own compost using bins in which materials are mixed until they decompose. Others purchase finished compost. When compost is added to soil, it releases nutrients that are vital for healthy plants, and healthy bacteria and microbes will thrive in organically-rich soil.
The Magic of Mulch
Mulching is a simple way to add biodegradable materials to the soil. Evergreen needles, tree leaves, lawn clippings, chicken manure, etc., can be worked into the soil to decompose. This process improves the air spaces between the soil particles and rearranges the sand, silt and clay to produce optimum soil structure, improving the water retention and drainage balance and making nutrients available to plants.
When soil has proper structure and sufficient nutrients for healthy plants, optimum health has been achieved, and great soil will lead to great landscaping, turf and gardens. Congratulations and keep on growing!
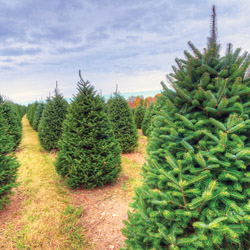
Cut Christmas Tree Selection and Care
A fresh cut tree can be a wonderful addition to your holiday décor as well as a treasured Christmas tradition. Unfortunately, with poor care a cut tree can be looking wilted and worn long before December 25, but if you know a few tricks, you can keep your tree looking vibrant and lush throughout the season. Extend the life of your cut tree this Christmas and enjoy the beauty of the season much longer!
- In selecting a tree, make sure the “handle” at the bottom is long enough to allow the trunk to fit into your tree stand. Otherwise, it will be necessary to remove large branches near the base, which could ruin its appearance, shape and visual balance.
- Check the tree’s freshness before your purchase by bending, pinching or flexing needles. They should be somewhat pliable and not fall off easily. Avoid purchasing a tree that is already showing signs of dryness.
- Make a fresh cut to remove 1/4″ to 1″ of wood from the base of the trunk before putting the tree in the stand. If you use a “center pin” stand, make sure the hole is drilled in the stem after the tree is trimmed.
- Once home, place the tree in water as soon as possible within 6-8 hours after cutting the trunk. This will help the tree better absorb moisture to keep the needles plump and secure.
- If needed, trees can be temporarily stored for several days in a cool location, such as a garage, before being taken indoors and decorated. Place the freshly cut trunk in a bucket full of water. The tree may need to be supported to keep it from tipping over.
- To display the trees indoors, use a stand with an adequate water holding capacity for the tree. As a general rule, stands should provide 1 quart of water per inch of stem diameter.
- Use a stand that fits your tree. Some stands have circular rings at the top, so the ring must be large enough for the trunk to fit through the hole. Other stands are open, which may allow a greater range in trunk size. Avoid whittling the sides of the trunk down to fit a stand. The outer layers of wood are the most efficient in taking up water and should not be removed.
- Keep your tree away from sources of heat such as fireplaces, heaters, heating vents and direct sunlight, all of which can make it dry out more quickly. Lowering the room temperature will slow the drying process, resulting in less water consumption each day.
- Check the stand daily to make sure that the level of water does not go below the base of the tree. With many stands, there can still be water in the stand even though the base of the tree is no longer submerged an unable to absorb water.
- Apply Wilt-Pruf, an anti-transpirant, to branches to help prevent moisture loss and needle drop. This should be done as quickly as possible before decorating the tree.
- Do not use additives in the water, including floral preservatives, commercial tree preservatives, molasses, sugar, bleach, soft drinks, aspirin, honey, etc. Clean water is all that is needed to maintain the tree’s freshness.
- Miniature lights, particularly LEDs and other energy-efficient bulbs, will produce much less heat and reduce drying of the tree. Do not overload the tree with too many lights.
- Always inspect light sets prior to placing them on the tree. If worn, replace with a new set. And, do not overload electrical circuits, fuses or circuit breakers.
- Always turn off the lights when leaving the house or when going to bed. Minimize how long the lights are on, such as not leaving the lights on during the day when they are less visible.
- Monitor the tree for freshness by bending or pinching needles to test their flexibility. After Christmas or if the tree is dry and brittle, remove it from the house.
With just a few common sense steps, you can find a lovely fresh cut tree and keep it beautiful throughout the holiday season.

Autumn: Why Plant Now?
 Although many gardeners plant trees and shrubs in the spring, knowledgeable gardeners plant in the fall to take advantage of all this fabulous season has to offer. But why is fall planting better than spring planting?
- Stress Reduction
Transplanting causes stress as plants are removed from containers, balls or established locations and changed to new locations. Planting in the fall, when a plant is entering dormancy and is generally hardier and sturdier, reduces this stress so the plant can thrive.
- Establishing Strong Roots
Fall planting “establishes” trees and shrubs by encouraging root growth. Because the soil is still warm, the roots continue to develop until freezing, though the upper parts of the plant are already dormant. When transplanting in the spring, the developed roots are active and delicate tips or rootlets, as well as buds and new leaves, are more easily damaged.
- Weather Resiliency
Trees and shrubs planted in the fall are better able to withstand the rigors of the next summer’s heat and dry conditions because they have much longer to develop healthy roots systems and become thoroughly established. This is especially critical in dry climates or areas prone to drought or irregular rainfall.
- Faster Maturity
The “head-start” of fall planting results in a larger plant in less time, helping create a mature landscape without waiting for smaller plants to catch up. This can be especially critical when replacing dead or damaged plants in a mature landscape to avoid a gap or uneven look.
- Water Conservation
Planting in the fall saves watering time and promotes conservation by eliminating daily watering. Cooler temperatures with the addition of both morning and evening dew contribute greatly to soil moisture availability in fall without as much supplemental watering.
- Color Confirmation
Fall is the best time to see a plant’s autumnal color. Planting in the fall eliminates the surprise of the wrong color or unexpected shades that may not coordinate with nearby plants. By planting in autumn, you’ll know exactly what you’re purchasing and planting, and you will be able to match better with your existing landscape.
- Saving Money
Last but definitely not least, buying your beautiful trees and shrubs in autumn can save big money. We discount prices on trees and shrubs to create room for holiday season materials and pass the savings on to you. Selection may be more limited later in fall, however, so don’t wait too long to take advantage of great savings.
Autumn can be the ideal time to plant trees and shrubs, whether you are adding to your landscape, replacing plants or starting a whole new look. If you plant in autumn, you’ll be amazed at how lovely your landscape will look next spring.
Freshen Up for Fall
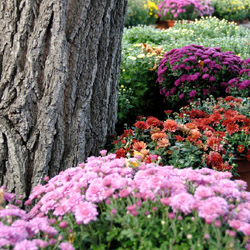
 Transform summer garden pots, planters and window boxes into magical displays this fall. The addition of mums, winter pansies and ornamental cabbage and kale are always excellent choices but you can really spice things up with the inclusion of a few of these colorful, cold-hardy selections. Which ones will look best for your autumn landscape?
- Acorus gramineus ‘Ogon’
This graceful, fan-shaped acorus variety is ideal for adding height to plantings. It keeps its color and shape into the winter for visual interest as other plants lose their vibrancy. - Acorus gramineus ‘Variegatus’
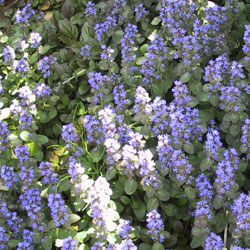
This is the white-variegated version of ‘Ogon’. Its white-green striping is the perfect complement to mixed planting in silver, pink, purple or blue, and its lightness adds freshness to the arrangement. - Ajuga reptans ‘Burgundy Glow’
This ajuga has a trailing habit and pretty, variegated leaves. Its blue flowers are scattered in fall and summer but this plant blooms profusely in springtime. - Ajuga reptans ‘Mahogany’
The rich mahogany color of the shiny, short-stemmed leaves turns darker and more lustrous in the winter, ideal in a frosted or snowy landscape. Pretty bright blue flowers punctuate this creeper, mostly in the spring. - Ceratostigma plumbaginoides ‘Leadwort’
The prolific flowers of this plumbago are an intense gentian-blue and the foliage turns bright red in low temperatures, adding visual heat to the landscape even on cold days. - Euphorbia amydaloides ‘Purpurea’
This pretty perennial is exceptionally frost resistant. ‘Purpurea’ features upright branches with leaves that form a rosette pattern and turn from reddish to purple in the cold. - Helichrysum thianschanicum ‘Icicles’
Here’s an easy, fast-growing helichrysum variety with striking, velvety-silver leaves and a compact growth habit. - Lamiastru galeobdolon ‘Herman’s Pride’
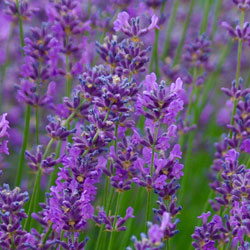
‘Herman’s Pride’ has serrated, shiny silver leaves with green venation and yellow flowers in the spring. The plant trails as it grows, making it perfect as an accent in hanging baskets, taller containers and window boxes. - Lavendula lantata ‘Silver Leaf Lavender’
This lavender variety has silvery-white leaves that are velvet-like to the touch and hold their color throughout the winter. Dark purple-blue flowers appear by the second year and contrast beautifully with the foliage. - Lysimachia nummularia ‘Goldilocks’
Proven to do equally well in both sun and shade, ‘Goldilocks’ exhibits wonderful versatility. The golden foliage creeps and hangs in lush profusion of round, shiny leaves. - Salvia officinalis ‘Icterina’
This sage has a glowing, golden-yellow variegated leaf. ‘Icterina’ maintains its shape and holds its color long into the winter. - Salvia officinalis ‘Purpurascens’
The eggplant-colored leaves of this sage warm up any planting. Try it as a culinary herb as well and enjoy the subtle taste. - Salvia officinalis ‘Tricolor’
‘Tricolor’ offers a unique combination of purple leaves with white borders that turn pink when temperatures drop.
No matter which of these plants you opt for, you’ll enjoy the rich colors and variation they bring to your autumn plantings.