

Winter Gardener’s Calendar
A perfect time to plan! Curl up with your gardening books and the gardening magazines and catalogs you’ve received in the mail. Get out the gardening journal and start dreaming…
General Landscape
- Clean up when you get a break in the weather. Remove fallen branches and downed evergreen clumps. Rake leaves to prevent stains on concrete and dead patches on lawn. If freezing weather is still in the forecast, leave the mulch in place.
- If your Christmas tree is still around, set it where the dropping needles will provide mulch, use the branches as additional insulation for perennials, or get together with neighbors to rent a chipper and create wood chips for larger mulch.
Houseplants
- Perk up tired houseplants by removing dead and dying leaves. Wash under a soft shower in the sink or tub.
- Spider mites love living in warm dry winter homes. Check for mites by looking for tiny speckles on leaves.
- Transplant if roots are growing through the drainage holes or over the pot edge. Pick up some new larger trend-setting colored pots to perk up your décor. Or, if you don’t want to move into a larger pot, untangle the roots and cut back by 1/3, scour the pots and replant with new soil.
- Remember to turn your plants each week as they begin to grow towards the weaker window light.
- Plant a terrarium or miniature garden. If you can’t play in the dirt outside, bring the fun indoors!
- Pick up Valentine flowers. We have a fragrant and beautiful assortment of red, pink or white flowers. Come in and choose from cyclamen, miniature roses, orchids, and other colorful flowers that are the perfect “I love you!”
Vegetables:
- Plant short-term cover crop such as Fava beans when soil becomes workable.
- February: Start vegetable and herb seeds indoors:
| Broccoli Cabbage Celery Chard |
Eggplant Kale Kohlrabi Leeks |
Lettuce Onions, bulb Peppers Radicchio |
Scallion Spinach Tomatoes Turnip |
General:
If you just need a breath of aromatic fresh garden air, stop by and smell ours! The humidity is perfect and will instantly transport you to spring. While here, check out the latest trends in gardening colors, containers, new plant varieties, and tools. Of course, we also have a wide selection of books to provide ideas. If you have any questions or need suggestions, we’re here to help. We’d love to see you!
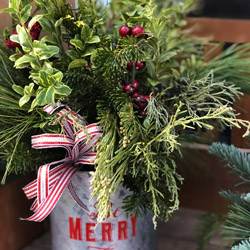

Holiday Ornamentation and Décor From Nature
Holiday Ornamentation and Décor From Nature
Your garden and landscape is a gorgeous setting from its first blooms and buds in spring through its luxurious bounty of summer to a rainbow of gorgeous autumn foliage and harvesting. You can continue to enjoy that beauty through the winter when you plan for natural ornamentation long after the ground freezes and snow falls. Both inside and outside, there are many ways to enjoy natural holiday décor from your garden and landscape.
A Natural Holiday Landscape
Choosing landscaping plants that offer winter interest in their shapes, evergreen foliage, colorful bark, and long-lasting berries is an easy way to create natural winter beauty in your yard. A wide range of plants can offer unique winter features in different parts of your landscape, such as…
- Japanese Maple
This tree’s graceful, swooping branches make it a great specimen or focal plant, and it is available in different sizes to suit different landscape locations. - Winterberry
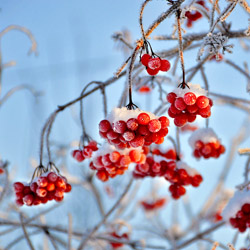
This shrub comes in a range of sizes, and its bright red berries stay colorful and intact through the winter, as they attract winter birds and wildlife. - Hollies
With its classically shaped foliage and glossy green hues, holly is a holiday favorite, and when it produces bright berries, it’s the perfect seasonal accent in the landscape. - Red Dogwood
This shrub really shines with its colorful bark, which is yellow at the base but becomes bright red on the stems, making a beautiful statement in a snowy landscape. - Walking Stick
The crazy curves, whorls, and twists of this tree-like shrub are eye-catching in any landscape, and look especially distinct when decorated with snow and ice. - Arborvitae
This classic evergreen shrub is available in different sizes and colors, ranging from a yellow-gold to lime to all shades of green, and it is versatile throughout the landscape. - Witch Hazel
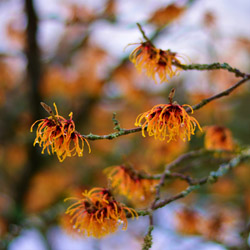
The graceful winter flowers are an unexpected surprise from witch hazel, but provide an angelic elegance to the landscape long after other flowers have faded. - Viburnums
The winter berries of these shrubs range from white and pink to red, blue, purple, and black, and they are a favorite treat for hungry winter birds. - Mugo Pine
An ideal dwarf shrub for smaller yards or tight landscape spots, this evergreen is an excellent choice for suburban landscapes and provides shelter for winter wildlife.
These are just a few plants that can add amazing winter interest to the landscape. One of our exceptional nursery staff will be able to offer numerous additional options that will thrive in your yard, no matter what your soil condition, sunlight levels, or size constraints.
Using Natural Décor Indoors
The beauty of winter plants isn’t confined to outdoors when you get creative with your natural holiday décor. There are many wonderful projects you can create from the autumn and winter landscape, including…
-
- Boughs, Swags, and Bunches
Use pines, berry sprigs, interesting twigs, and other prunings to create natural decorations for mantles, doors, arches, shelves, and bannisters. Sharp pruners will create clean cuts for these accents, and use floral wire to discreetly shape each arrangement as you’d like, tying on burlap or ribbon bows for additional festive accents. - Wreaths
A natural wreath is a beautiful accent for any door, indoors and out. Use a wire form or grapevine wreath as a base, adding your own clippings and prunings to fill in the shape. Floral wire can help secure the arrangement, and a large burlap bow is a beautiful finish. For an even more unique wreath, consider creating one with succulents, herbs, or other unusual plants. - Ornaments
There are many ways to create natural ornaments for the holidays. Use clear glass or plastic ornaments and fill them with a pine or berry sprig, small pine cones, dried flowers or buds, or even nuts. Add in a bit of glitter for more festivity, and finish with a decorative bow. Other options include stacking graduated twig lengths into a Christmas tree shape or tying or gluing twigs into a star or snowflake for rustic ornaments. - Gift Tags
Use thick craft paper to create rustic gift tags. Tearing the edges of the tags will add more texture, and glue on a pine sprig or berry twig as a natural accent. A small accent ribbon can also add more color to the gift tag. - Pine Cone Crafts
If you have large pine cones in your yard, you can bring them indoors to create a variety of holiday crafts. Cones can be dipped into wax to create lovely fire starters, or use melted suet and birdseed to create a feeder for winter birds. Glue five narrow pine cones together to create a star shape, or use six to create a rustic snowflake, and add glitter to the edges for festive sparkle. Tie several cones together with floral wire to create a seasonal kissing ball, or arrange smaller cones into a tree shape to decorate with small pompons. - Garden “Gingerbread” House
Use cardboard shapes for the walls and roof, and adorn the house with pine sprigs, colorful leaves, berries, pebbles, and other natural accents for a decorative house that won’t threaten your waistline. Consider gravel, mulch, and other supplies from your garden center to add even more interest to the piece. - Accented Candles
Gently warm the surface of a large pillar candle and press natural accents into the soft wax to add decoration. Cedar and arborvitae sprigs are great choices, and could be left on the candle or peeled off to leave a clean, elegant impression. Any color candle can be used, or you can create arrangements with several candles in seasonal colors. - Wood Slice Decorations
Cut thin slices of larger pruned branches to create rustic decorations. Use sandpaper in different grits to smooth the cut surface, leaving the rough bark intact for interest. You can use wood-burning tools to create patterns, words, or personalization on each slice, then varnish the slices to seal them and create a glossy finish. - Branch Décor
Medium and large branches can become fun natural décor in your home. Use a spade bit to drill shallow impressions into a branch to hold tea light candles, or use a large, regular drill bit to create support for taper candles. You can wrap the branch with colorful holiday ribbon for even more festivity. - Walnut Characters and Scenes
Walnut shells of all sizes can be made into delicate and amazing decorations. Shell the nuts, then fill each half with miniature scenes, animal characters sculpted from modeling clay, or a classic nativity. Shells can also be painted to become ladybugs or bumblebees, or left natural and accented with a pompon nose, googly eyes, and felt antlers to become happy reindeer.
- Boughs, Swags, and Bunches
There are many fun, rustic, easy crafts that can bring natural décor and ornaments into your home for the holidays and help you appreciate and enjoy how beautiful nature is all year long.
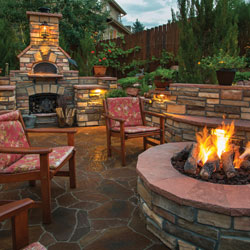
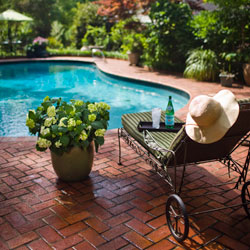
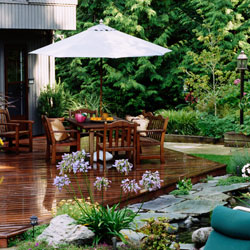
How to Design Your Outdoor Living Area for Mixed Generations
How to Design Your Outdoor Living Area for Mixed Generations
Creating your perfect landscape can be a project that lasts a lifetime, but how can you effectively design your outdoor living area when your needs, activities, and preferences may change over the years? Fortunately, with a little careful consideration, you can create a functional and beautiful landscape that all generations of your family will enjoy.
Assess Your Landscape
When you’re planning outdoor spaces, it is critical to work with what already exists in your landscape. This means creating a landscape that flows with the contours of your property, is suitable for your overall space, and will thrive in your climate. Before planning extensive landscape work, consider…
- Soil quality and condition and any adjustments that may be required
- Irrigation needs, including sprinkler systems, runoff, and natural rainfall
- Sunlight levels and how light changes throughout the year
- General climate and microclimates throughout the yard
- Views from different angles, including those you may want to preserve or block
- Existing structures, pathways, and borders that may or may not be altered
- Potential trouble spots, such as narrow yards, steep slopes, or poor drainage
Â
By thoroughly understanding your landscape before you begin redesigning an outdoor space, you can effectively plan proper landscaping that will thrive rather than struggle.
Assess Your Needs
Once you know what you already have to work with in your landscape, you can assess what your needs are for an outdoor living space and how you can create a fun and enjoyable sanctuary in your yard. The needs of toddlers, teens, and adults can be very different, however, and it is important to note how preferences may change in the years to come. By thinking ahead, you can make full use of your landscape through different life and family stages without needing to redesign the yard every few years. Consider your family size and how it may change, including whether family members may move away or move closer, whether different family members may be interested in different outdoor activities and how changing schedules may affect how your landscape is used over time.
Planning Outdoor Spaces for Changing Needs
It may seem impossible to plan a beautiful landscape that will be just as enjoyable and useful a decade from now as it is today. Considering different aspects of your outdoor living space one by one, however, can help you develop a master landscape plan that your entire family, as well as friends, neighbors, and guests, will enjoy for years. When designing your outdoor living space, consider…
- Seating
There should not only be enough seating for the entire family to share, but also for entertaining. This might include casual kids’ parties, summer barbecues, or more formal events such as a graduation party or bridal shower. While you may not have a seat for every guest over the years, be sure there is space to add additional seating for special events if needed. - Storage
From garden tools and children’s toys to sports equipment, patio cushions, and outdoor holiday decorations, there is always a need for more storage related to your landscape. A shed is a good option, or integrate storage areas that will serve multiple purposes such as built-in storage benches or bins that are part of the patio or deck design. - Gardens
If you want a productive, delicious garden as part of your landscape, opt for adjustable gardening areas such as raised garden beds, container gardens, or vertical gardening spaces. These types of gardens are more easily adjusted over the years as your desire and needs for fresh produce change, as well as being more adjustable for garden care. - Activity Areas
Plan activity areas in your outdoor space that can be modified over the years to meet different needs and preferences. A play structure in an open area, for example, can be removed when young children outgrow it, and that same area can become a badminton court for the whole family. A fire pit area, yoga space, or meditation niche can also be adjusted through the years. - Pathways
Getting from one area to another in your yard should be easy for everyone to navigate. Broader pathways will be easier for unsteady youngsters as well as seniors with mobility assistance, and shallower steps are easier for feet of all ages. Be sure paths are level and even, and plants should not overgrow busy traffic areas. - Entertaining
If you enjoy entertaining in your yard, be sure to incorporate gathering spaces for groups to enjoy. This might include a fire pit with conversation seating, a grilling area with good access to tools and supplies, or even an outdoor kitchen for more elaborate parties. Proper lighting or a speaker system for music can also be essential for an outdoor entertaining space. - Lighting
You will want to see your outdoor living space and enjoy it even after the sun goes down. Pathway lighting, spotlights on focal points, and fun string lighting or outdoor chandeliers in entertaining areas can all be part of your lighting design to keep your outdoor space functional as well as festive after dark. - Privacy
Always consider privacy when designing your outdoor living space, not only from nearby streets or neighbors’ yards but also from different areas of your yard. Be sure there are good sightlines where necessary, but also consider cozier niches where individuals or smaller groups can feel more private. Plants, screens, lattices, or trellises are all good options for enhancing privacy. - Plants
Choosing plants for your landscape is easy when you consider not only your own future needs but the future needs of the plants as well. Note the mature sizes and growth patterns of plants when placing them in your landscape, and consider how much maintenance they may require over the years to be sure you can give them the care they require even as your life changes. - Focal Points
Focal points can unite your landscape and bring it together visually, even as your needs may change. An eye-catching specimen plant, for example, can become the backdrop for family events and photos, and these familiar sights will always be welcome to your family even as its composition changes.
No matter how your outdoor living space may need to change over the years as your family and its preferences change, you can plan a versatile, adaptable space to change with your family. What won’t change, however, is how much you can enjoy that space and how it will bring your family together for many memorable moments.
Need help planning the perfect landscape for your family’s diverse and changing needs? Our experts can help you craft outdoor living spaces you will enjoy for years!
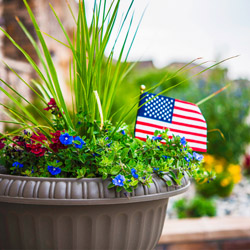
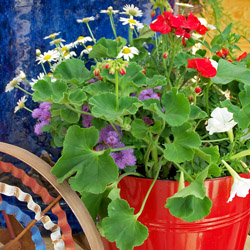
Fourth of July Porch Pots
Fourth of July Porch Pots
A porch pot can be a beautiful accent to any entryway, and with a bit of patriotic flair, you can easily style a Fourth of July porch pot as a decorative highlight for all your summer festivities. By carefully designing the pot and the plants it showcases, it can burst into festive glory just in time for the holiday.
Beyond the Porch
A porch pot is traditionally an elegant container positioned at the main front entryway, but for summer porch pots, it’s fun to look beyond the porch for where to show off your festive container. Where will you be greeting guests and entertaining during the summer months? Any gathering spot can be made more seasonal with the right porch pot, so consider placing one or more pots:
- In the corners of a deck or patio
- Spaced along a bare section of fence
- On stairs leading up to a deck or porch
- Framing an outdoor kitchen or grill area
- Accenting a pool surround
- As an outdoor table centerpiece
Wherever your pots can be seen, they’re sure to add a patriotic bit of color to give a party-like atmosphere to your outdoor living spaces.
Picking the Pot
When choosing a container for a Fourth of July pot, first consider where the pot will be located and choose an appropriate size for that location. Be mindful that the pot will not block walkways or cause a trip hazard on stairs, and be sure it is sturdy enough to hold up the plants you want to showcase.
The pot style can vary, and choosing a pot with patriotic colors can add instant flair to your decorative arrangement. Red, white, or blue pots are always popular choices, or the pot could be painted with a patriotic theme such as stars and stripes. Spattering a white pot with red and blue is a more subtle but festive option, or larger polka dots could be a bold and colorful statement. To honor a military connection, consider a pot with a camouflage pattern, or choose a more demure, understated pot to let the plants be the true stars of the arrangement.
Top Fourth of July Flower Picks
You can add any type of flowers you’d like to a Fourth of July porch pot, but red, white, and blue blooms are always favorites. Fortunately, there are many flower choices that can work into this color palette, including:¦
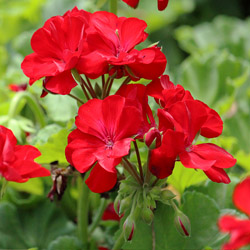
- Red – Petunia, zinnia, verbena, cardinal flower, impatiens, geraniums, nasturtium
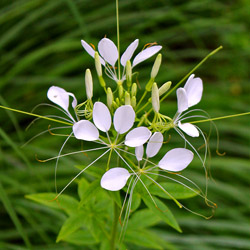
- White – Zinnia, dahlia, geranium, verbena, daisy, petunia, cleome, vinca, snapdragon, impatiens
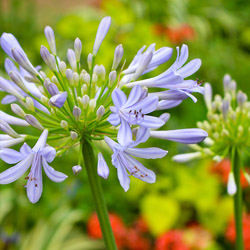
- Blue – Agapanthus, clematis, scabiosa, verbena, wishbone flower, lobelia, salvia, ageratum
In addition to bloom colors, you can also consider flower shape and opt for star-shaped blooms such as lilies, pentas, or star jasmine. Tall, flowing grasses with arcing plumes are another elegant option that mimics the gracefulness of fireworks. The round balls of allium and the spikes of salvia are other interesting shapes popular in patriotic displays.
Whichever plants you choose for your pot, remember the thriller-filler-spiller rule of thumb to create a lush, eye-catching arrangement, and it will sure to be a stunning decoration.
Planting Your Pot
Ideally, a Fourth of July porch pot should be planted several weeks before the holiday or any summer event so the plants have a chance to settle and fill in the pot before the celebration. If you’ve chosen a larger pot, add a layer of rocks or a brick or two to the bottom of the pot so it is properly weighted and will be less likely to tip over if accidentally bumped. Choose h potting soil to give each plant the proper nourishment, and ideally choose plants that all have similar sunlight and watering needs so they will thrive together.
Summer Porch Pot Care
Once planted, you will need to give your Fourth of July porch pot the proper care so it continues to look its best. Positioning the pot on a moveable stand or casters will help you be sure it has adequate light even as shadows shift from week to week, and rotating the pot will ensure the plants grow evenly. Water the pot appropriately, bearing in mind that smaller pots will need more frequent watering, especially on hot summer days. Fertilizing should not be necessary if you’ve used h potting soil, but if needed, fertilize sparingly to avoid burning roots or causing uneven growth. As the plants get taller, stake them if necessary, and protect the pot from sudden summer storms so it is not tipped or flooded.
Decorative Accents for a Fourth of July Porch Pot
It’s easy to add a bit of holiday flair to the pot if you choose decorative stakes with a red, white, and blue theme. Miniature flags are a popular choice, or you can find metallic sprays or faux firework rockets that will add a fun touch to the arrangement. Pinwheels are another great option that add a bit of movement to the pot.
Tying a ribbon around the pot can also add a holiday touch. Choose red, white, or blue ribbons, or opt for a rustic theme with gingham or checked patterns. Gold ribbons can also be a meaningful way to honor military members and deployed troops.
Be creative and fun with decorative accents for your porch pot, and it will be an eye-catching, attractive arrangement and a focal point for all your summer holiday entertaining.
Holiday Poinsettia Care
A poinsettia plant is the quintessential holiday decoration and hostess gift for holiday parties or visits. They’re great as a centerpiece, decorating a step or filling in any empty space with bold holiday color and cheer. You can even position multiple poinsettias into elaborate arrangements mimicking trees or other holiday shapes. Have a look at our poinsettia do’s and don’ts list to help keep your poinsettia lush and beautiful through the holidays and beyond.
- DO place your plant in indirect sunlight for at least six hours per day. If direct sun can’t be avoided, diffuse the light with a shade or sheer curtain to prevent burns that can discolor the bracts or dry the plant out too quickly.
- DO provide room temperatures between 68-70° Fahrenheit. Generally, if you are comfortable, so is your poinsettia. Cooler (but not cold!) temperatures will be better than hotter areas, but you must avoid sudden chills.
- DO water your plant when the soil feels dry to the touch. Use distilled water without any chemicals or additives. If you must use tap water, allow it to stand for 24 hours before watering so chemicals can evaporate out of the water.
- DO fertilize your plant after the blooming season with a balanced, all-purpose fertilizer if you hope to keep the plant thriving for many weeks. Use fertilizer properly according to the manufacturer’s instructions.
- DON’T place plants near cold drafts or excessive heat. Avoid placing plants near appliances, fireplaces or air ducts, and minimize ceiling fan use or other drafts and breezes near the plant. Don’t place poinsettias near exterior doors that are opened and closed frequently.
- DON’T expose plants to temperatures below 50° Fahrenheit. Poinsettias are sensitive to cold, so do not place them outside during the winter months.
- DON’T overwater your plant or allow it to sit in standing water. Always remove a plant from any decorative container before watering so you can carefully gauge the water it receives, and allow any excess water to drain completely to minimize the risk of root rot.
- DON’T expose your plant to chilling winds when transporting it. Use the plant sleeve provided when you purchased the plant. If you will be giving the plant as a gift, wrap it lightly with tissue when transporting it.
- DON’T fertilize your plant when it is in bloom. After blooming, use the appropriate fertilizer and follow instructions carefully to provide your poinsettia with the proper nutrition.
- DON’T give up on your poinsettia! These plants can be stunning for many weeks after Christmas, and with proper care you can enjoy your poinsettia for long after the holiday season.

Flirting with Spring
In January and February, winter flirts with spring. Despite snow on the ground, there will be occasional warm days, balmy breezes and stunning blue skies that remind us of the rich colors of spring. On these flirtatious days, quince, forsythia and pussy willow begin to emerge from dormancy. With this slight swelling of buds, it is time to cut a few branches to bring spring indoors, so even when winter reappears with the next freeze or storm, we’re reminded of the warmer times to come.
Forcing Branches
Just like forcing bulbs, forcing branches will bring their buds into full beauty even if the outside weather isn’t quite right yet. To force branches, select plants that have set their buds in the fall or early winter. Look for branches with plump flower buds, and cut branches that you would have normally pruned in order to preserve the shape and health of the plant.
Next, scrape about 2 inches of the bark from the pruned end of the branch and make a 3-5 inch cut up the branch (lengthwise from the pruned end) to allow water to be absorbed. You can also split the end by carefully hammering it, but avoid crushing the tissues. Fill a tall container or vase with room-temperature water and floral preserver, then place the cut branches in it. Place the arrangement in a dimly lit room for 2-3 days, then move into a brighter area (but no direct sunlight). Change the water and cut 1 inch off the bottom of the stem each week. Mist the branches daily. Although they may take up to 3 weeks to bloom, the delightful bursts of color will be a celebrated reward for your time and efforts.
Flowering Branches for Forcing
Depending on when you want your buds to bloom, there are a variety of great branches you can work to force into brilliance even when spring is weeks away.
Early bloomers…
- Witch Hazel
- Cornelian Cherry
- Forsythia
- Pussy Willow
- Azalea
- Flowering Quince
For Later Blooms…
- Magnolia
- Apple
- Crab Apple
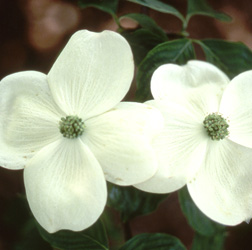
- Flowering Dogwood
- Hawthorn
- Red Bud
- Mockorange
Decorating With Forced Branches
There are many different ways you can add a little spring glory to your interior décor with forced branches. Consider…
- Using blooming branches in lieu of any flowers in vases.
- Putting shorter branches in bud vases on a windowsill.
- Adding branches to candle centerpieces or other arrangements.
- Twining thinner branches around a wreath form.
- Using the tallest branches in a tall, thin floor vase.
Spring will be here before you know it, and you can speed it along when you force branches to enjoy their blooms a few weeks early!
PINK DAY IS SOON HERE!
Pink Day – Join us in the fight against breast cancer!
Wear your pink and join us on June 9th from 10am – 4pm and support Daniel’s Lawn and Garden Center’s efforts to help find a cure for breast cancer, a cancer that affects way too many Moms, sisters, wives and friends. We donate a portion of the day’s proceeds to the Susan G. Korman Foundation!
Any questions about this event please call us at 610-287-9144 or visit www.danielslawnandgarden.com. See you there. Think Pink!!!
This is our seventh year, and this year’s event is bigger and better than last year’s.
Last year we raised over $2000 for breast cancer research. Beginning at 10am, the public is invited to dress in pink, and enjoy free children’s activities and participate in raffles to win pink prizes.
Pony rides will be available from 12 to 2pm.There will be a Stepping Stone Craft for Kids.
Added feature come learn about how to combat Spotted Lantern Flies at our Free Program at 11:30am.
Daniel’s Garden Center will be decorated in pink and will be having special pink items available that day with proceeds benefitting breast cancer research.
Additionally there will be special Pink Day Only sales on selected items throughout the store, including propane tanks for $11.99 and 50% off trees and shrubs.
Come out on Saturday, June 9 and support Daniel’s Garden Center’s efforts to help find a cure for breast cancer, a cancer that affects way too many Moms, sisters, wives, and friends.
Any questions about this event, please call us at 610.287.9144 or visit www.danielslawnandgarden.com.Think Pink!!
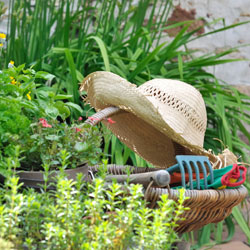
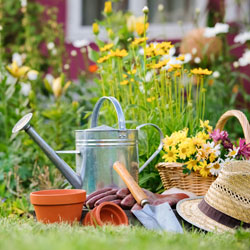
Tips for a Gardening Gift Basket
A gift basket is a great present for any gardener in your life, and is easy to customize to any gardening preferences. With just one trip to the garden center, you can create the perfect gardening gift basket for any special occasion.
When to Give a Gardening Gift Basket
A gift basket can be a wonderful choice for any special occasion, including birthdays, anniversaries or holidays. A gardening gift basket is especially thoughtful for someone who is interested in starting gardening as a new hobby, perhaps after retirement or buying a new home where they finally have gardening space. Anyone starting a clean eating or clean living lifestyle may also appreciate getting started gardening so they can better control their own food sources.
Creating the Very Best Gardening Gift Basket
There are many great ways to vary a gift basket to match the recipient’s gardening preferences exactly. Being flexible also allows for creativity in assembling the basket and making it a fun, enjoyable gift. To create a practical, customized gardening gift basket, it is important to consider all the necessary parts, including…
- Basket
A wicker or woven basket is the traditional choice for building a gift basket, but when you’re making a gardening basket, you can think of more creative containers instead. For a small basket, consider using a galvanized bucket, watering can, bird bath, window box or other creative option. Larger gift baskets can start with a large planting pot or similar container, or even something as practical as a wheelbarrow. - Base
Filling the bottom of a basket provides a sturdy base to support gifts, as well as to be sure the basket does not tip over when it is filled. For a gardening gift basket, good options for a firm base include a bag of potting soil or fertilizer, mulch, peat moss or other gardening goodies. A bag of birdseed or river rock can also be an exceptional base. Even a large hose can help fill the bottom of a container and will be another great gift. - Gifts
The bulk of the basket should be the different gifts that match the recipient’s gardening dreams. For a flower gardener, for example, that may include bulbs and seedlings of their favorite blooms, as well as flower pruning shears and other hand tools. A vegetable garden gift basket, on the other hand, would have different veggie seedlings, plant identifiers and perhaps some long-handled tools for working in the garden. A bee house can be a great addition for any type of garden to encourage more pollinators, and a garden hat, new gloves and how-to books are all good choices for any gardening-themed gift basket. Of course, a gift card will always make a perfect addition to any gift basket allowing the recipient to make a few choices of their own. - Decadent Extras
To make a gift basket extra special, be sure to add some luxuriously decadent gifts. These might be purely decorative items or artisanal extras, and can really add character and thoughtfulness to your gift basket. Wind chimes, welcome flags and gnomes or other whimsical pieces are great options, or choose items such as candles, soap, lotion bars, honey or other treats available from local artisans. - Fillers
A good gift basket will be lush and full of fun gifts, and you can easily fill in small bare spots in a gardening gift basket with a range of smaller, inexpensive gifts. Packets of seeds, vine ties, plant food, pot casters, or even a hose nozzle are just a few fun options that can really fill out a gardening gift basket. For colorful fillers, consider adding potted flowers or floral starts for blooms to serve as bows.
Finishing Touches
Once your basket is filled, it’s time to make it look more like a celebratory gift. Choose a card to include as a greeting, and wrap the lip of the basket with ribbon, twine or raffia to draw the gift together. Smaller baskets may even be entirely wrapped with cellophane or tissue so they can be opened for a fun surprise. Burlap can be another option for a rustic but still practical covering or wrap that can be used in the garden to cover delicate plants after the gift is opened.
A gardening gift basket can be an amazing way to celebrate any special occasion or friendship. By choosing gifts carefully and coordinating the basket to the recipient’s gardening wishes, the gift is sure to be a wonderful surprise that is happily appreciated every time the recipient steps into their garden.